
Create your first workflow using Hubspot
In this article, we will tell you how to generate a workflow using HubSpot to generate an email campaign that allows you to execute your marketing strategy while you’re sleeping. Hubspot is one of the most powerful and versatile tools of recent years when it comes to inbound marketing. Its interface is one of the most complete and includes the quick and easy creation of automated workflows. But first, let’s answer the question: What is a marketing workflow?
A marketing workflow is a series of automatic actions that are launched from the data obtained from a specific user or a group of them to convert leads, generate new ones, and/or improve relationships with your client base.
To create a workflow you need 2 factors:
✓ The conditional (if): It’s a statement that the target is expected to perform to later execute an action. Let’s say it’s the expected behavior in our marketing strategy. For example, the user visits a certain page on a certain date.
✓The action (do): Something that is done from the conditional statement. For example: After the user visited a certain page on a certain date, a specific email related to that page will be sent to the user.
For inbound marketing, workflows are elemental, since using them in conjunction with an in-depth strategy and analytics should help you meet your goals more efficiently.
In the next steps, we’re going to help you create your first workflow using HubSpot.
Step 1
First, you need to have an account created at hubspot.com. In order to be able to create workflows you need to have a professional or enterprise account, if you register now you can get a free 14 trial for each of them.
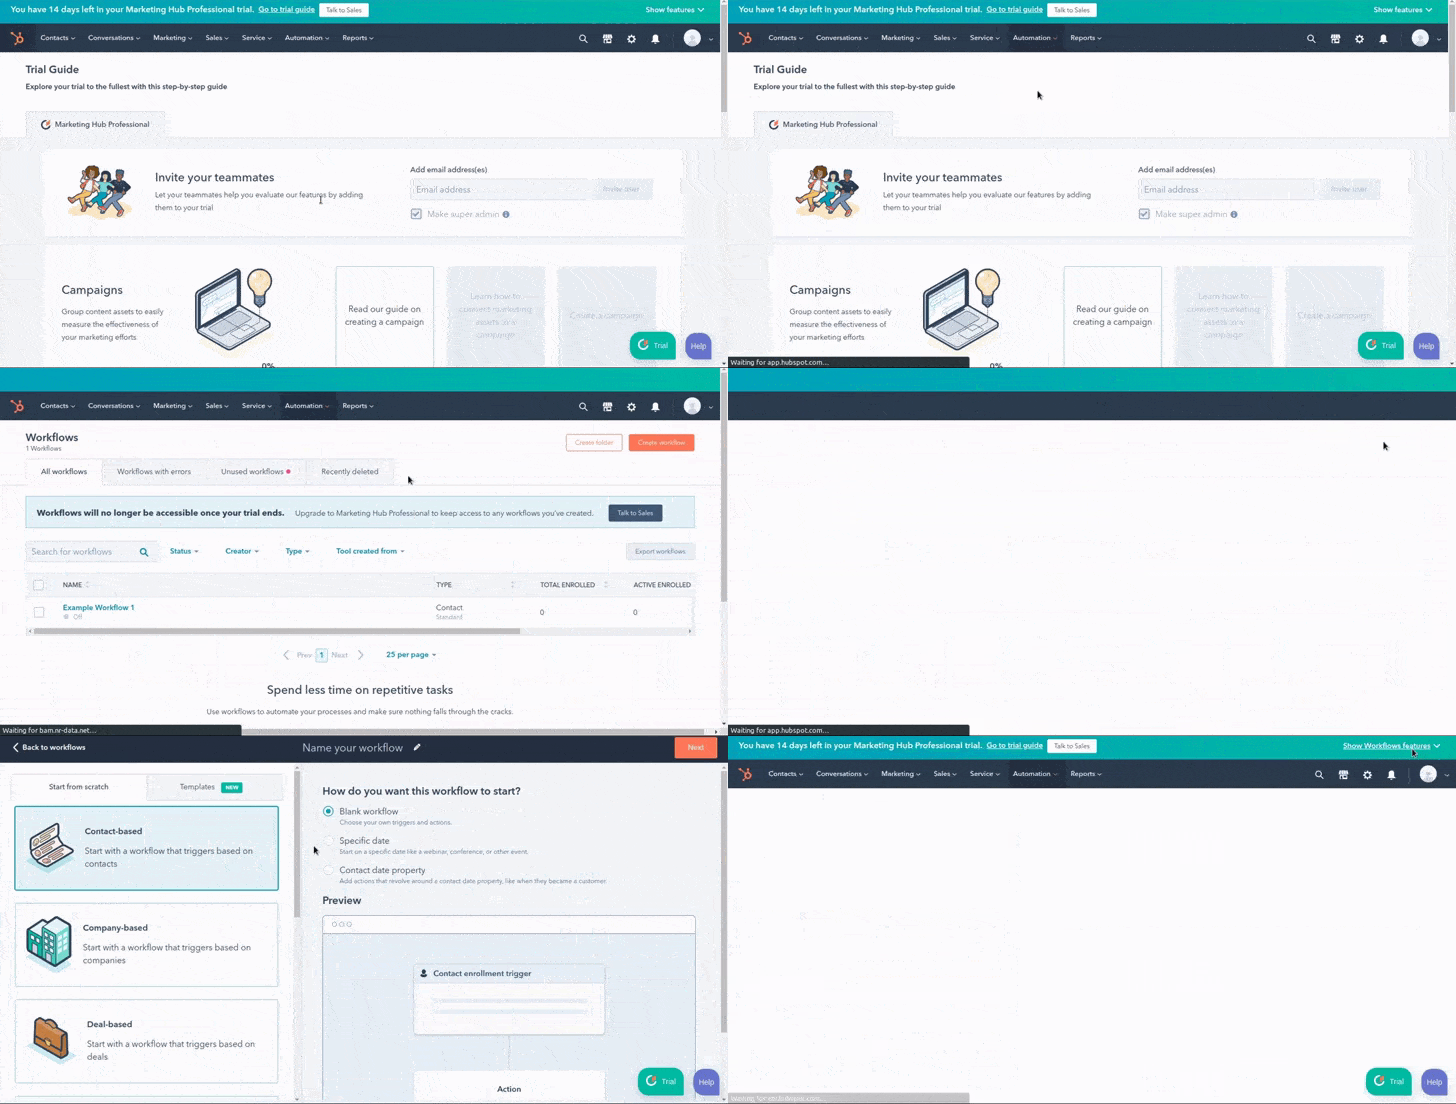
1.-When you have access to your dashboard, hover your mouse over the “automation” tab. Then click “workflows” to access your workflows page.
2.- Click the “Create workflow” button at the top of your screen.
3.- You can select start from scratch or you may want to select a template to use a prebuilt configuration for your automation. In this case, we are going to create a new one from scratch and we will select “contact-based”-> “blank overflow” to trigger based on contacts and open a blank canvas.
4.- Click “Next”.
Step 2
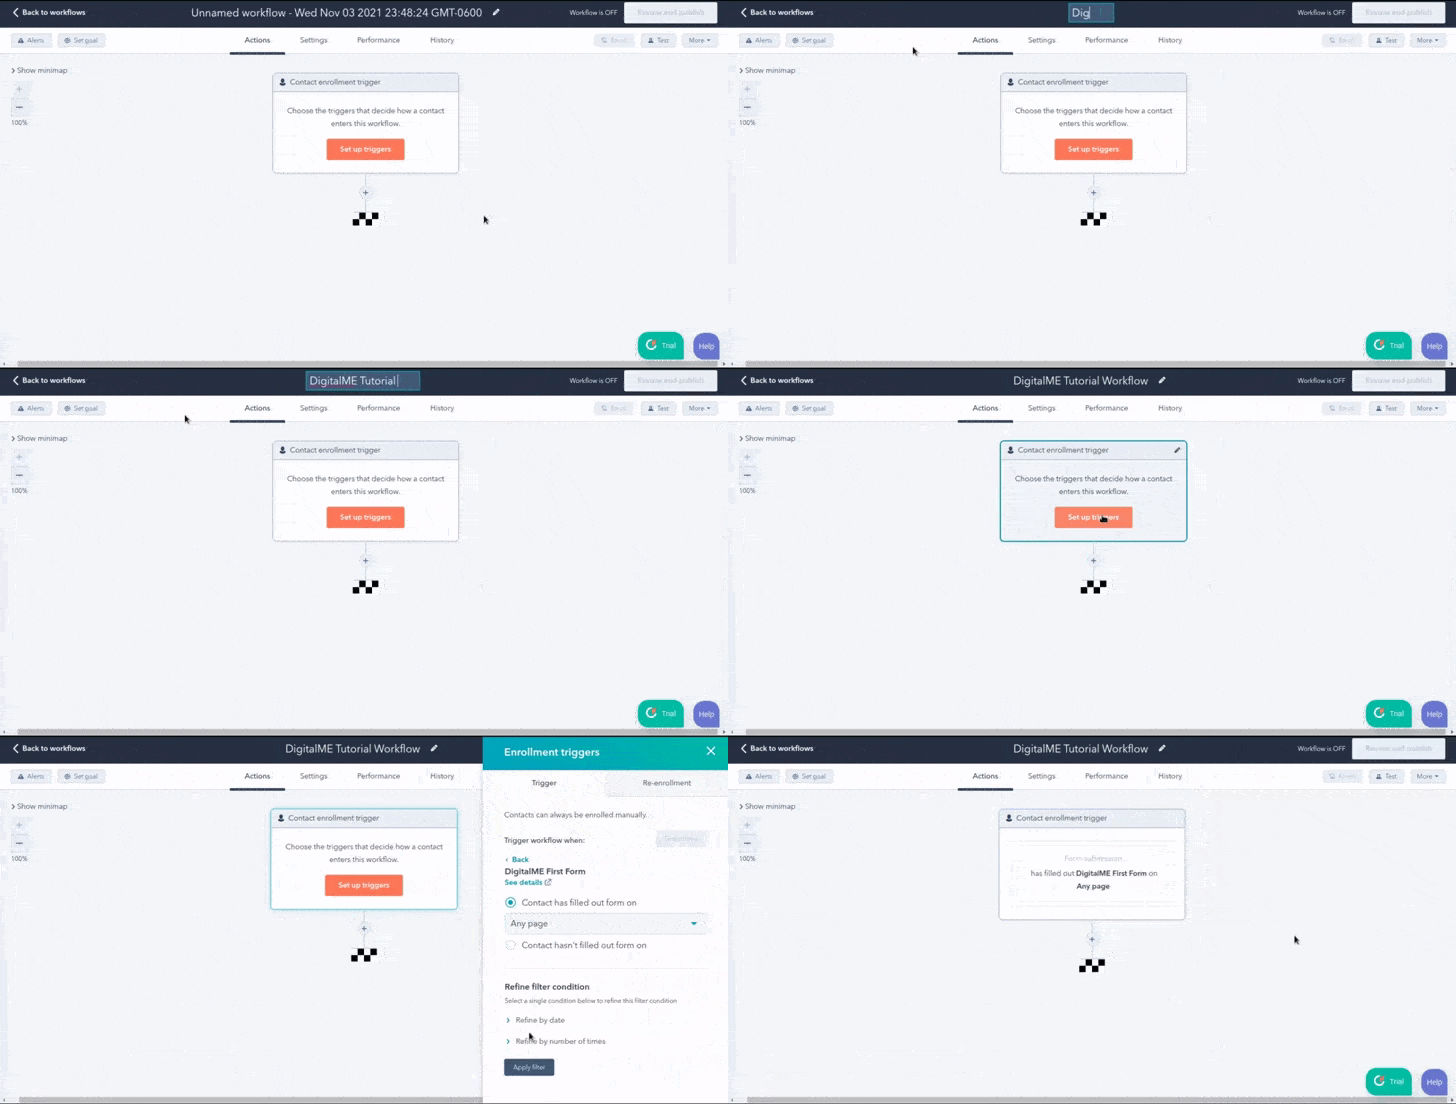
1.-You may want to change the name for your workflow by clicking the pencil icon at the top of your panel.
2.- Click the “set up triggers” button, so you can choose the configuration of your trigger criteria. In this case, we are going to filter by “form submissions” so we can trigger users who have submitted a form we have on our site. If you don’t have a form yet you can create a new one and place it anywhere you want. Select on what page you want this trigger to apply. You can refine the filter condition by date or number of times the form was submitted.
STEP 3
For the purpose of this tutorial we want that users that have submitted the form on our site to receive 2 special offers emails for a specific service so we are going to add an action:
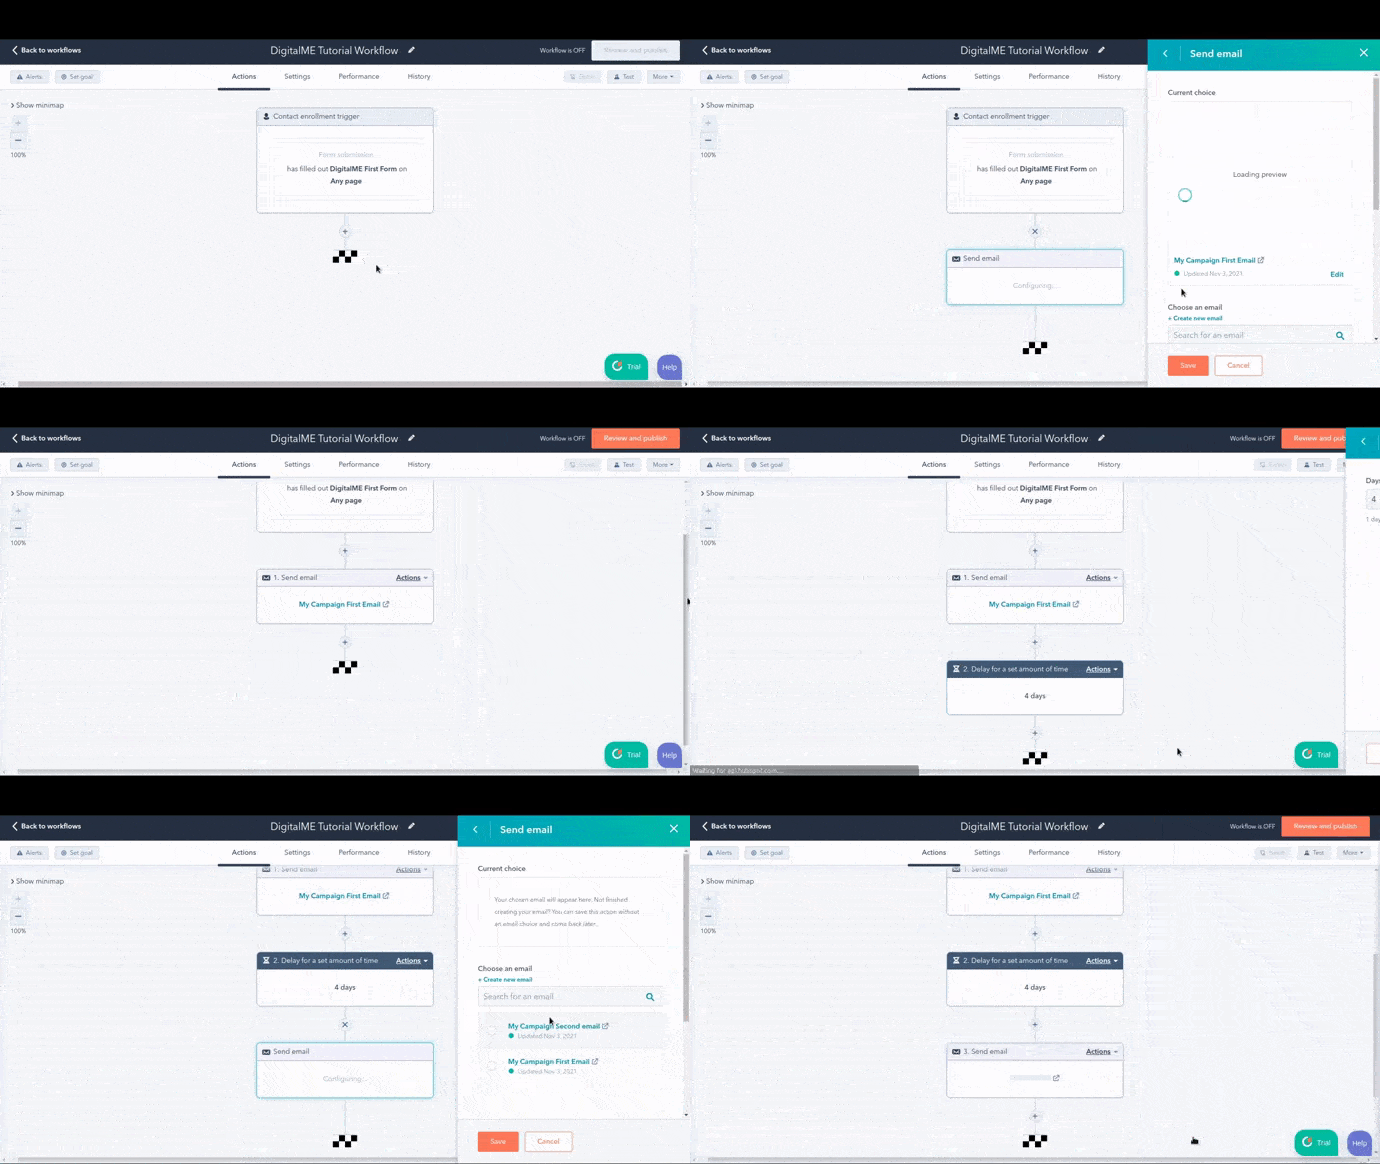
1.- Click the plus button below your contact enrollment trigger. Search for the “send email” action. Select the email that you want to send to those contacts. If you haven’t created one you can create one directly from that screen or you can create one using the email tool. Click “Save”.
2.- We want to have a delay of 4 days between the first and second email so we are going to add a “Delay for a set amount of time” action after the first email.
3.- We are going to add a second “Send email” action so we send a second email 4 days after the first one was sent.
STEP 4
You probably want to some unenrollment rules for when you have met some goals in your workflow. In this case, we want that when a user who submitted the first form submits a second different form, to stop them from receiving the emails.
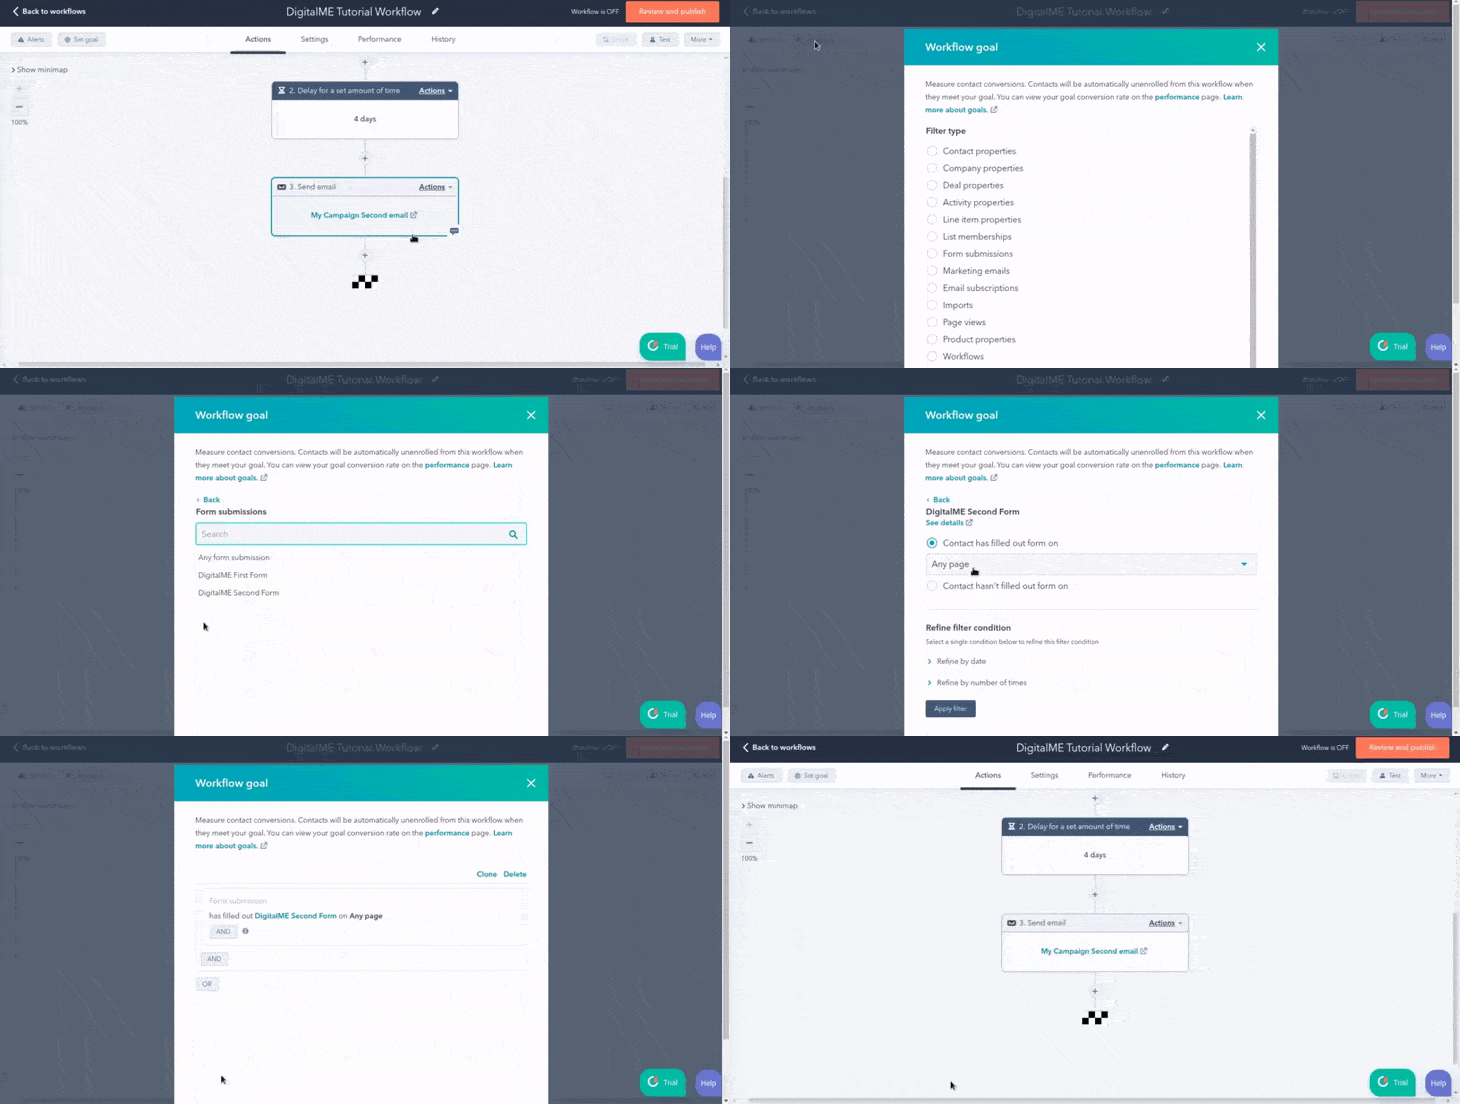
1.- Click the “Set goal” button at the upper left.
2. Select the “Form submissions” option”.
3.- Select the form submission you want to apply for unenrollment. You can refine by date and number of times just like the enrollment trigger. Click “Apply filter”
4.- Click “Save”.
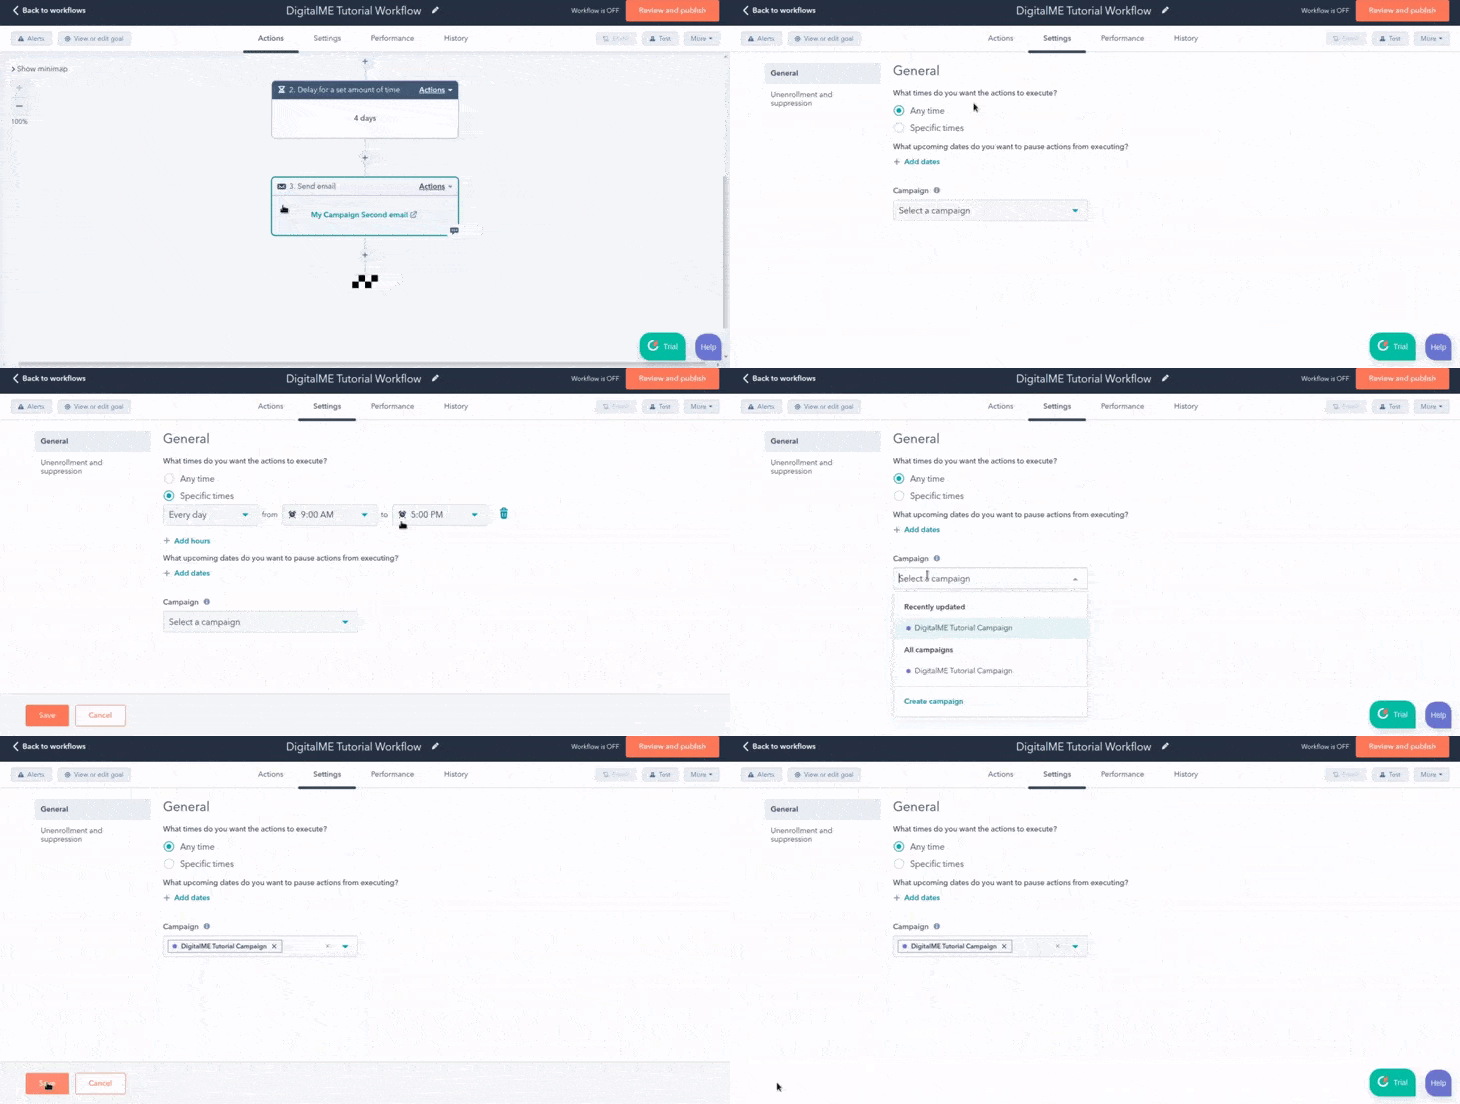
STEP 5
1.- Click the “Settings” tab to check the settings that you need for your workflow.
2.- You can specify times for your workflow to execute and if the workflow applies to a certain campaign.
3.- Click “Save”.
STEP 6
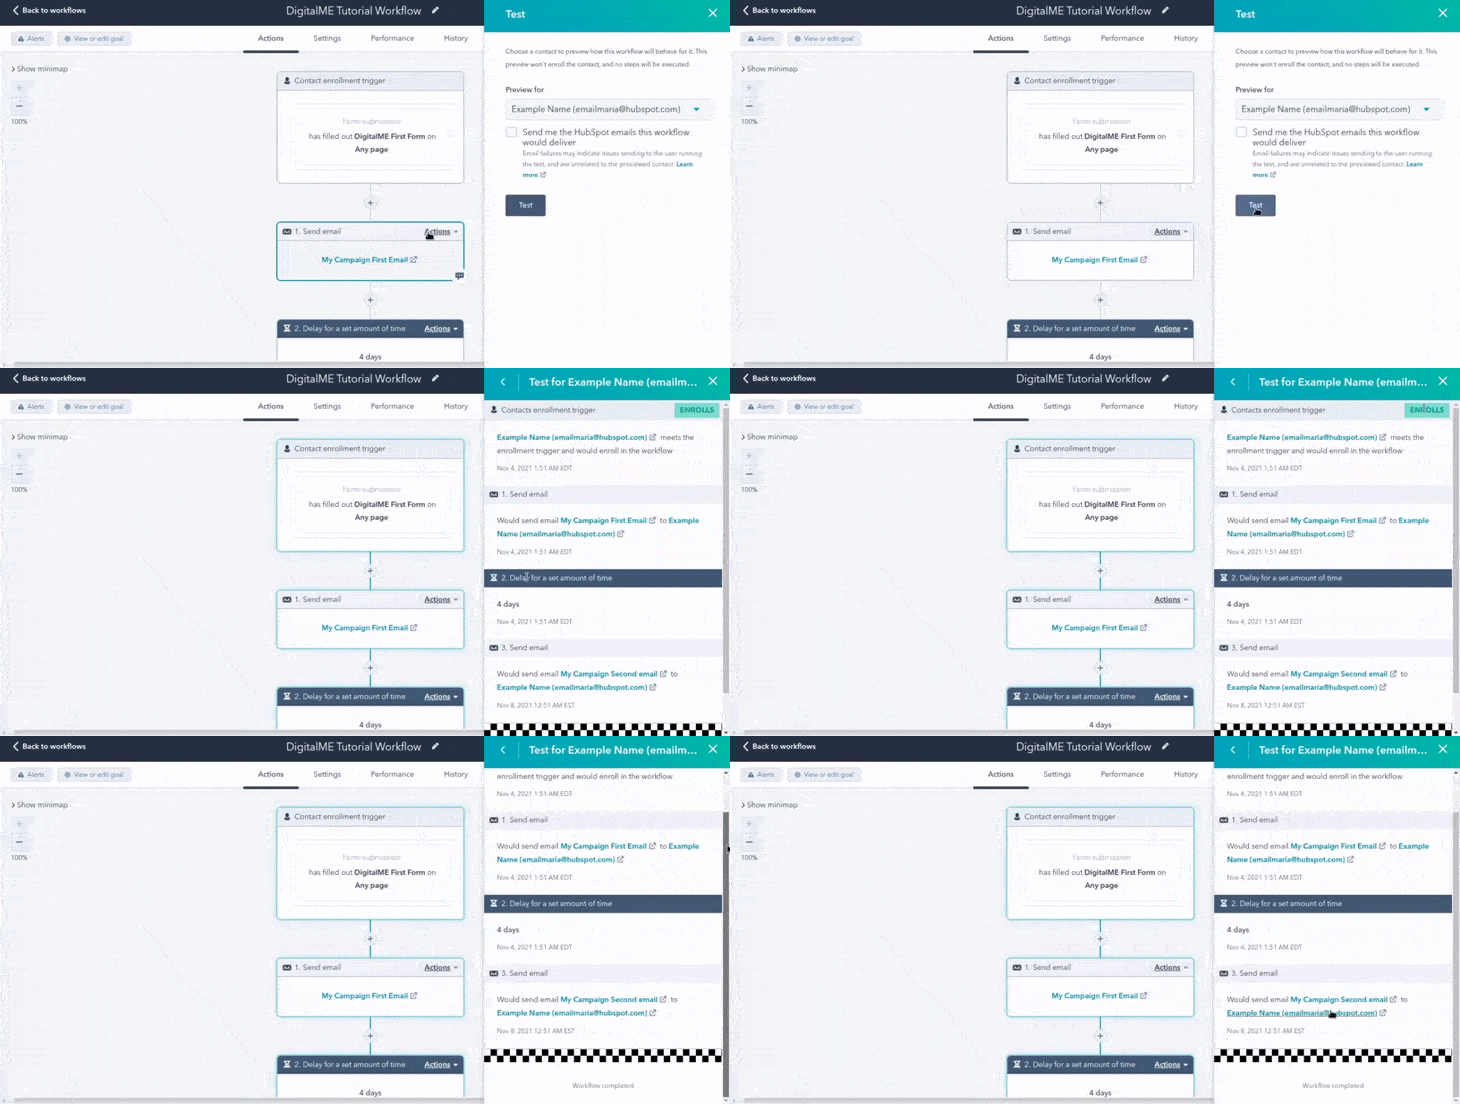
1.- Before you enable your workflow you may want to test it first to make sure is working properly. You can test it by choosing a contact you know that is triggered by the workflow.
2.- Click the “Test” button at the top of your panel, below the publish button.
3.- Select the contact you chose.
4.- Review if the workflow for your enrolled contact is correct.
STEP 7
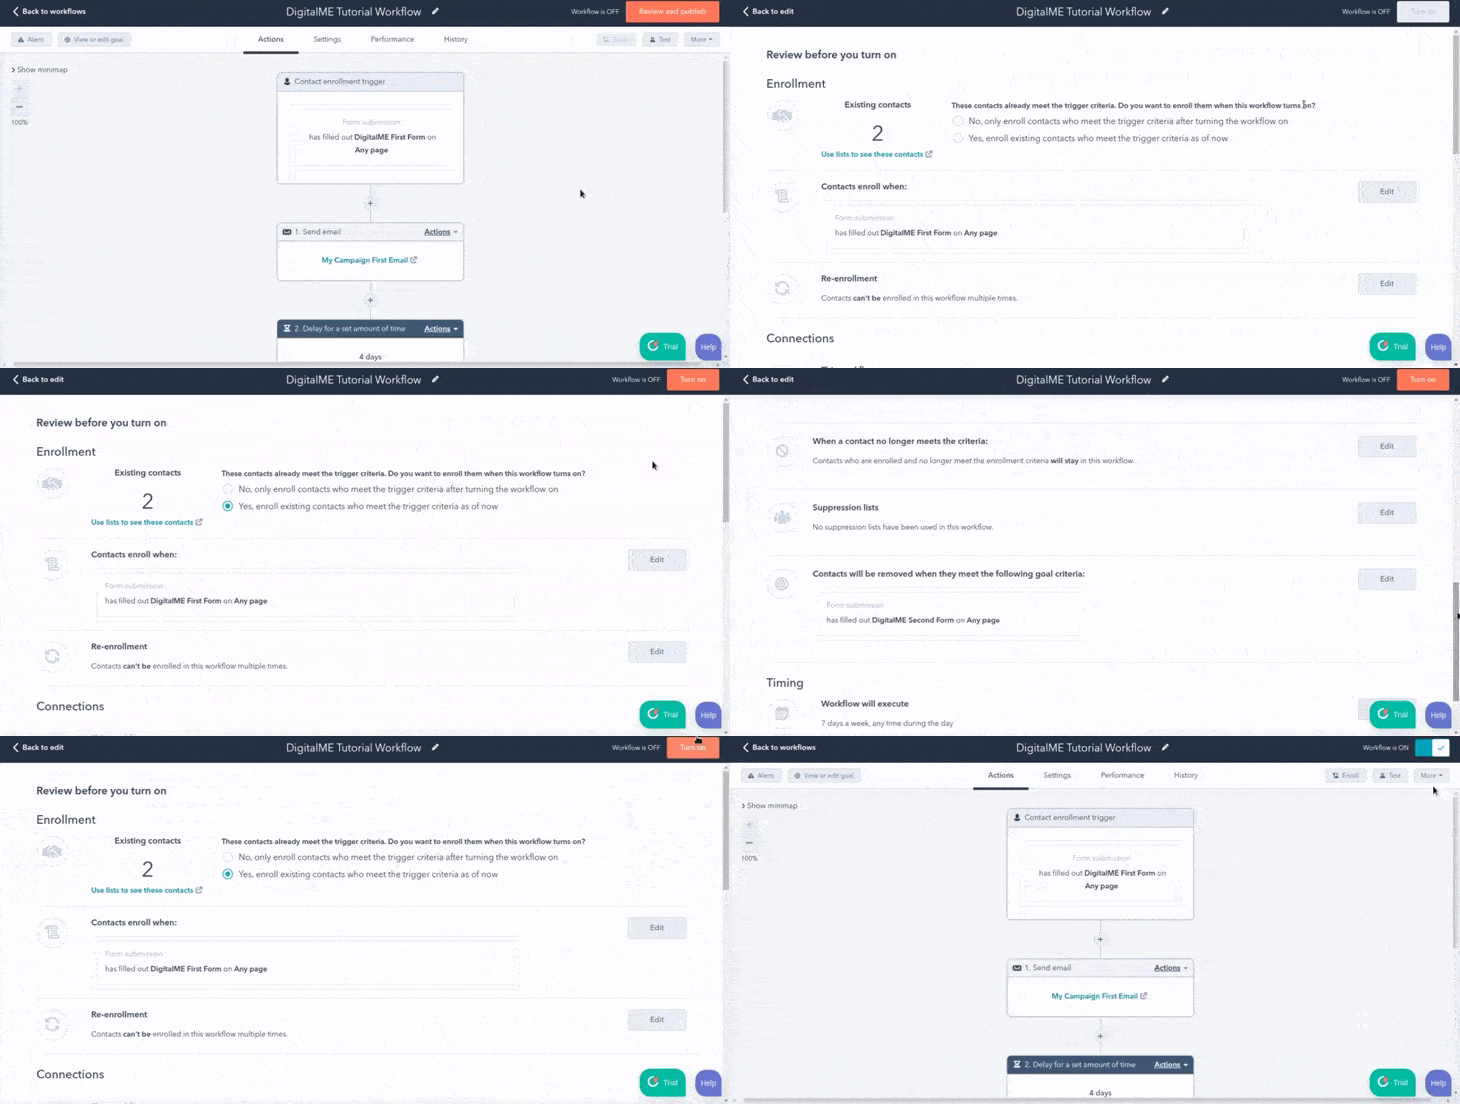
1.- Click the “Review and publish” button at the upper right.
2.- You can review how many existing contacts would enroll for this workflow. You can choose to enroll only future contacts or enroll the existing ones who meet the trigger criteria.
3.- Verify that the goals for unenrollment are properly set.
4.- Click “Turn on”.
That’s it! that’s how you create your first automated workflow using HubSpot. You are ready to start generating your custom and more refined ones. We hope this tutorial has been useful to you and remember that at DigitalME we have our HubSpot Partnered Service with which you can get the most out of your workflows. It includes 24/7 Support, workflow building (which means we can create your workflows for you), and a Bi-weekly call on Membership Management with Ross Jenkins, a HubSpot Expert. If it interests you please do not hesitate to contact us so we can arrange a call.

 IN VALENCIA AND SAN DIEGO