The importance of web forms
A form is an essential element for every website as it allows getting data directly from visitors. Although you can use web forms to obtain multiple types of user data, their primary purpose is to generate new leads by obtaining contact data. Web forms are an efficient way of communicating with customers as they are available at all times without needing an operator or a sales representative. Also, webforms are great for improving your business by getting customer feedback. If you are an ActiveCampaign user and want to know how to connect it to your web forms, in this article, we’re going to show you how and the benefits of doing it.

What are the main advantages of using a web form?
The best part of web forms is that they automatically store data and send notifications; when someone fills in the form, your website or CMS can store that information and notify you of the action. You can also connect your web forms with other tools such as your CRM or a marketing tool like ActiveCampaign. ActiveCampaign has a native webform integration with your website to obtain and store users’ data without effort. These are the main benefits of implementing a web form on your website:

Conversions
Web forms will increase your conversion rates since they’ll be getting you new leads. Whether they left their email address to know more about your services or subscribed to your newsletters, you can immediately add those contacts to your sales pipeline.

Versatility
You can use web forms for many cases where getting data is the primary goal. They’re great if a simple text box isn’t enough to get what you need, as web forms can handle multiple formats such as text, image, video, and audio.

Convenience
As long as your website is operational, web forms will be ready to do their job 24/7. Using them is beneficial for you and your users; you won’t need to be monitoring your web forms, and your users will be able to fill them in whenever they want. You can also place them all over your website if that’s what you need.

Tracking
You can flawlessly integrate your web forms with your web-tracking tools. They’ll give you relevant data from the users who visited your website and those who filled in the form. This is very important if you’re planning to use paid advertising or simply because you need to know your prospect’s interests.

Storage
Once someone fills in the form, you can safely store the information in your database. It’ll save you the time you spend saving the information yourself since the process is automatic. Also, if you connect your form to an external tool like AciveCampaign, the software can expand the functionality. ActiveCampaign, for example, lets you tag and segment users.

How do ActiveCampaign forms work?
Using ActiveCampaign web forms is a great way to add new subscribers to your marketing campaigns. The tool’s native functionality connects your forms to your campaign manager seamlessly. It works by generating a form directly on the form builder and using the code generated to place it on your website. ActiveCampaign will keep track of the form and the contacts who complete them. It can add those contacts to a list, and even add them to an automation. You can also give those users a special treatment like sending custom offers or adding tags so you can trace them.

How to use an ActiveCampaign form on your website
Follow these steps if you want to create a new form on ActiveCampaign and place it directly on your website:
How to create a form for your website on ActiveCampaign
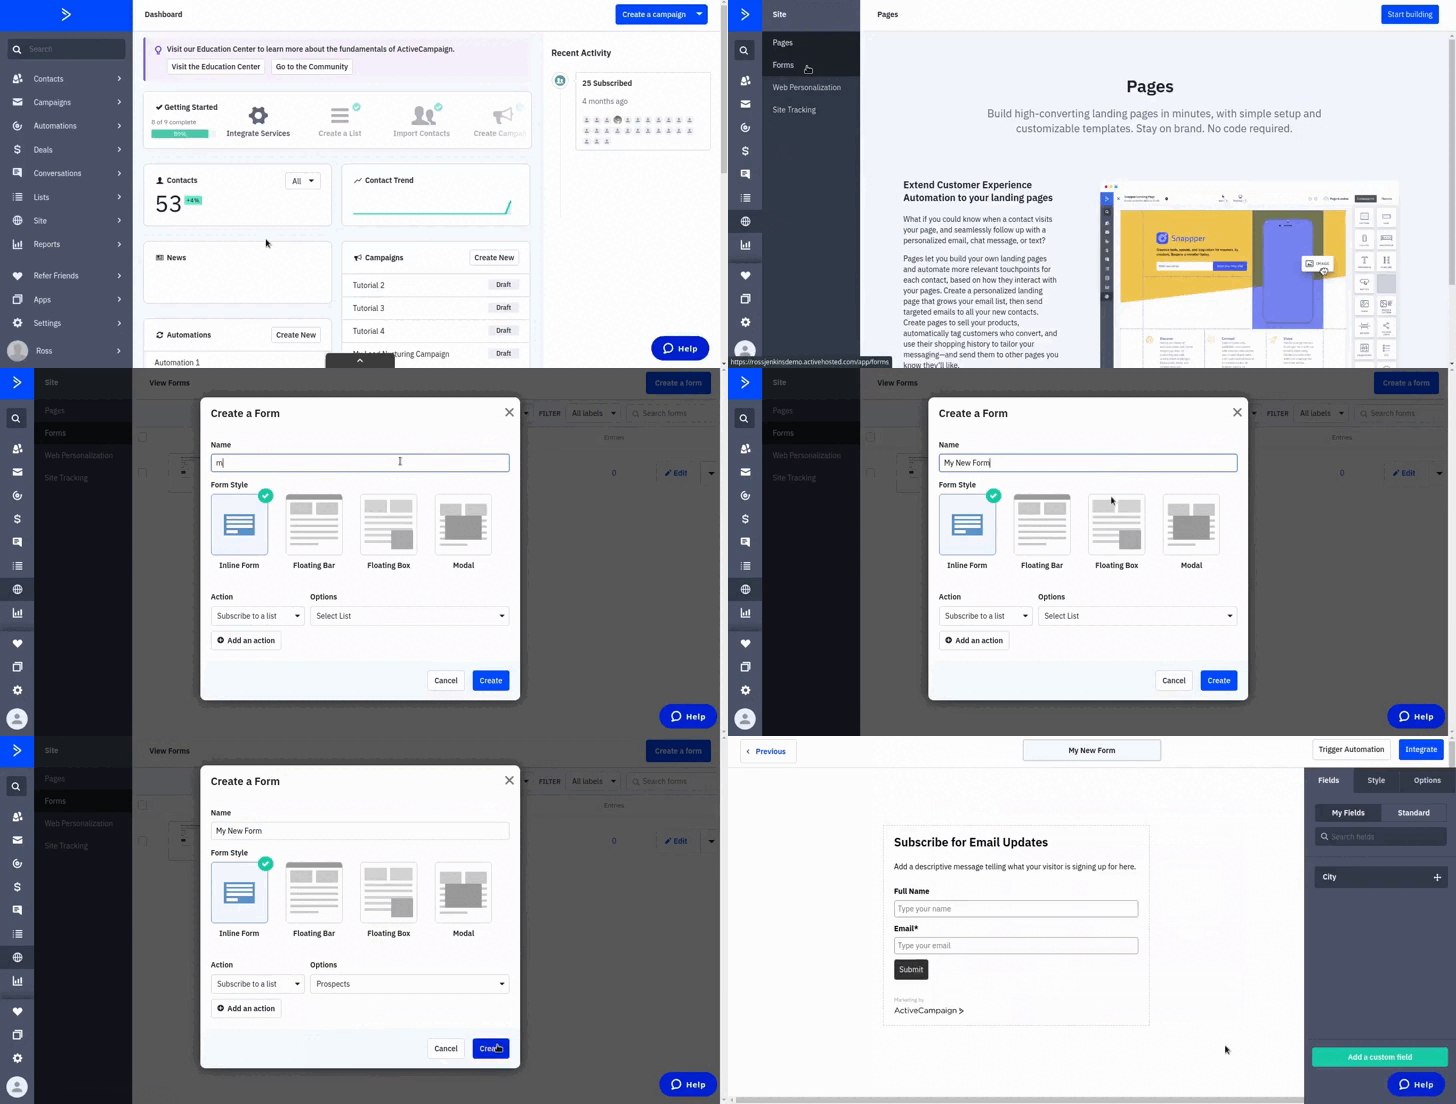
1.- Go to your main dashboard, and click on “Site”.
2.- It’ll display the site options. Choose the “Forms” one.
3.- It’ll show all of your created forms (will be empty if you haven’t created one). Click on the “Create a form” button to create a new one.
4.- Type in the name of your form. Choose the style you need for your form. These are the differences between each one:
Inline Form
This form is embedded along with the other contents of your page. The placement of the form will depend on where you place the code.
Floating bar
A horizontal form will be floating at the top or bottom of the webpage. It’ll remain visible as the user scrolls down or up.
Floating box
The same as the floating bar will remain floating this time in the shape of a box, and you can place it on the bottom (left or right) of your webpage.
Modal form
This form will pop up in front of your content. It’s the most convenient form if you are trying to get more data aside from the contact information.
5.- If you are selecting a floating or modal form, you’ll need to add the URL where you want to place the form.
6.- Choose the action you want to trigger after users submit your form. You can add more than one action. The default one is to subscribe to a list, but you can also choose to add a tag, add contacts to a deal, or an email action to notify that someone submitted the form.
7.- Click on “Create”. It’ll redirect you to the form builder.

Add all the fields you need
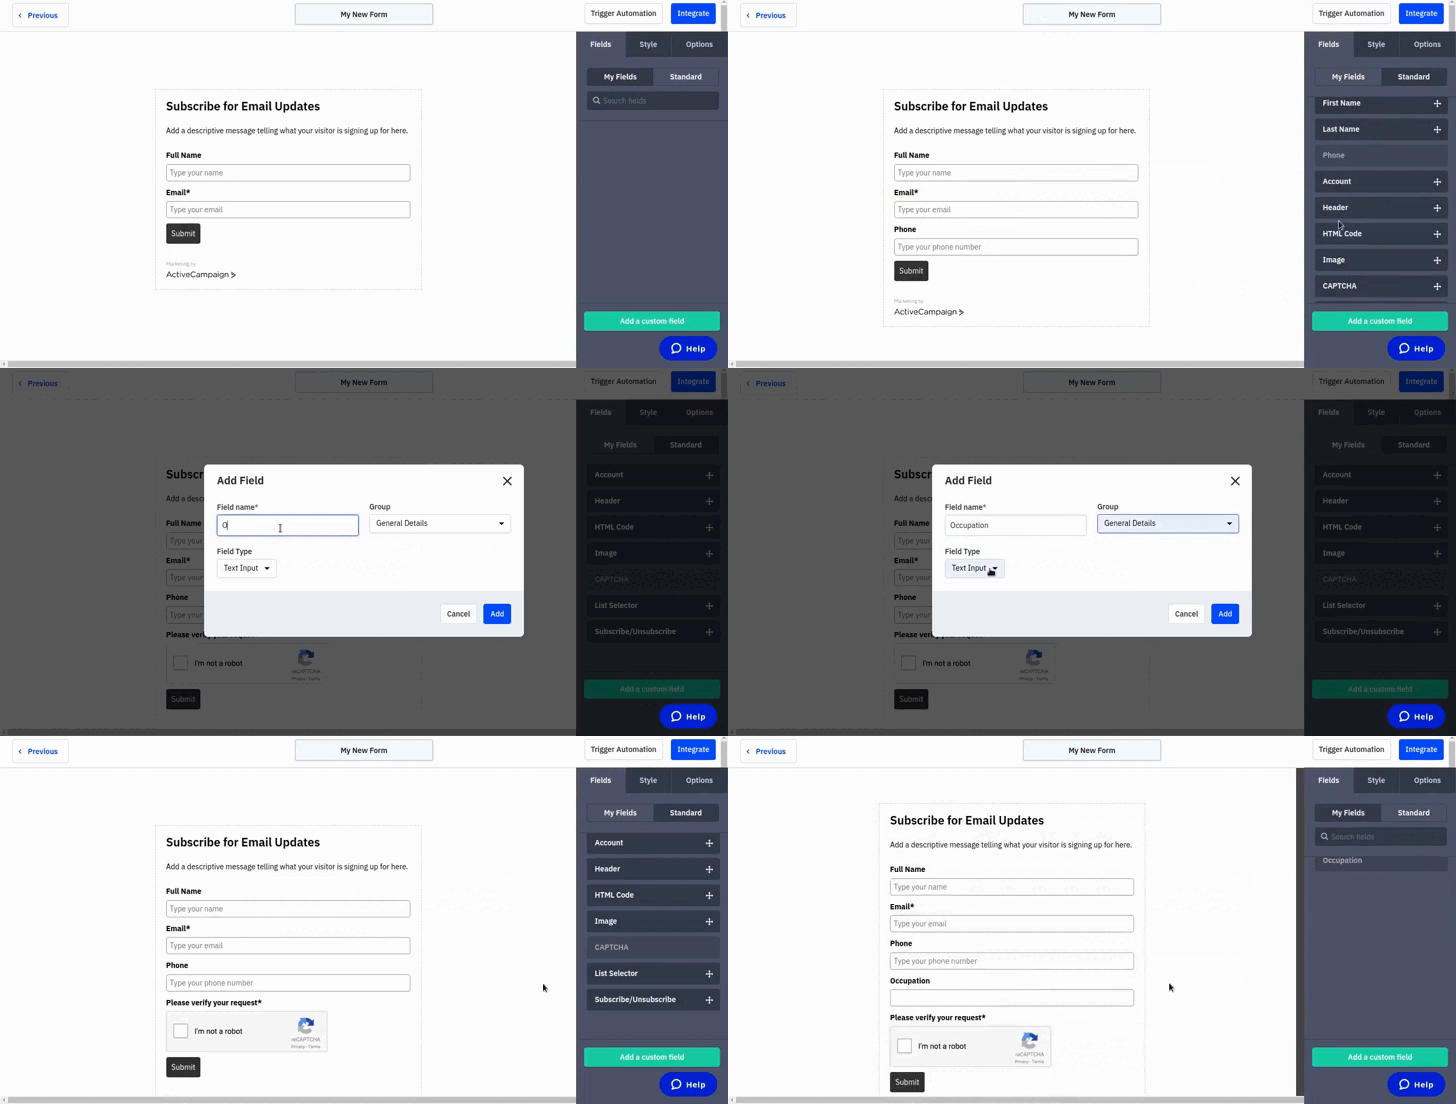
8.- Add the fields you need for your form by dragging it and dropping it on your form. If the field you need to use is not listed, you can create a custom one by clicking on the “Add a custom field” button. You can see your custom-created fields by clicking on “My fields”. You can see the AC’s custom ones in the “Standard” tab. There are some particular fields in there you can use to personalize your form even more:
HTML Code: Only available for inline forms. Use this field to add a special text or link to your form. For example, you can use this to add a privacy policy message with a link to your privacy page before they submit.
CAPTCHA: It helps you determine if the user submitting the form is a real person or if it’s a bot. CAPTCHA enables you to keep spam away.
Subscribe/Unsubscribe: You can add this field so users can decide if they wish to subscribe or unsubscribe from your lists. It’ll make the unsubscription process more friendly for them.

Change the style and options
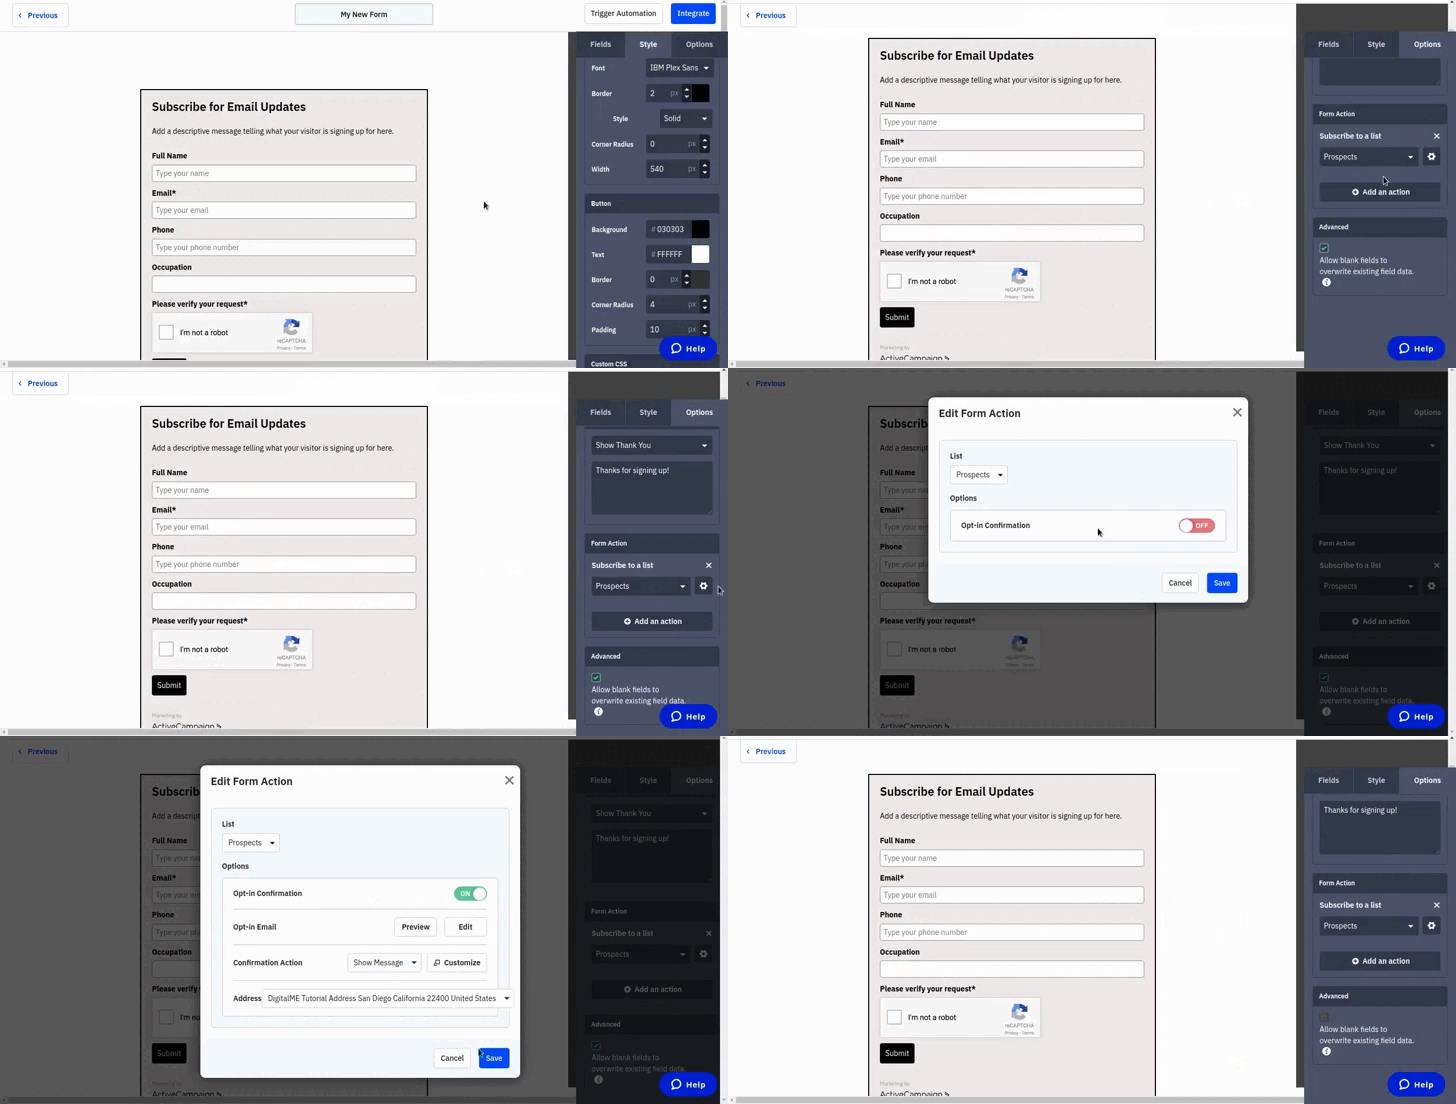
9.- On the style tab, modify the appearance of your form. You can change the layout, the colors, and the text style.
10.- To modify the options of your form, click on “Options”. These are the descriptions for each one:
On submit: The action that takes place after users submit the form. By default, it’s “Show thank you”, which displays the custom message you write inside the box. You can also choose “Open URL” so you redirect them to a different link like a thank you page.
Form Action: The actions you chose when creating the form will appear here. If you selected “Subscribe to a list”, you could set advanced opt-in settings by clicking the gear icon. You can enable opt-in notifications if you want users to confirm their subscription through email and display a message or open a link.
Advanced: Activate this option if you want ActiveCampaign to overwrite data with fields in blank if your contacts submit the form more than once. It will erase the data they submitted the first time.

Place the form in your website
11.- Once you have finished building your form, optionally, you can trigger an automation for it so a custom action will take place after they submit
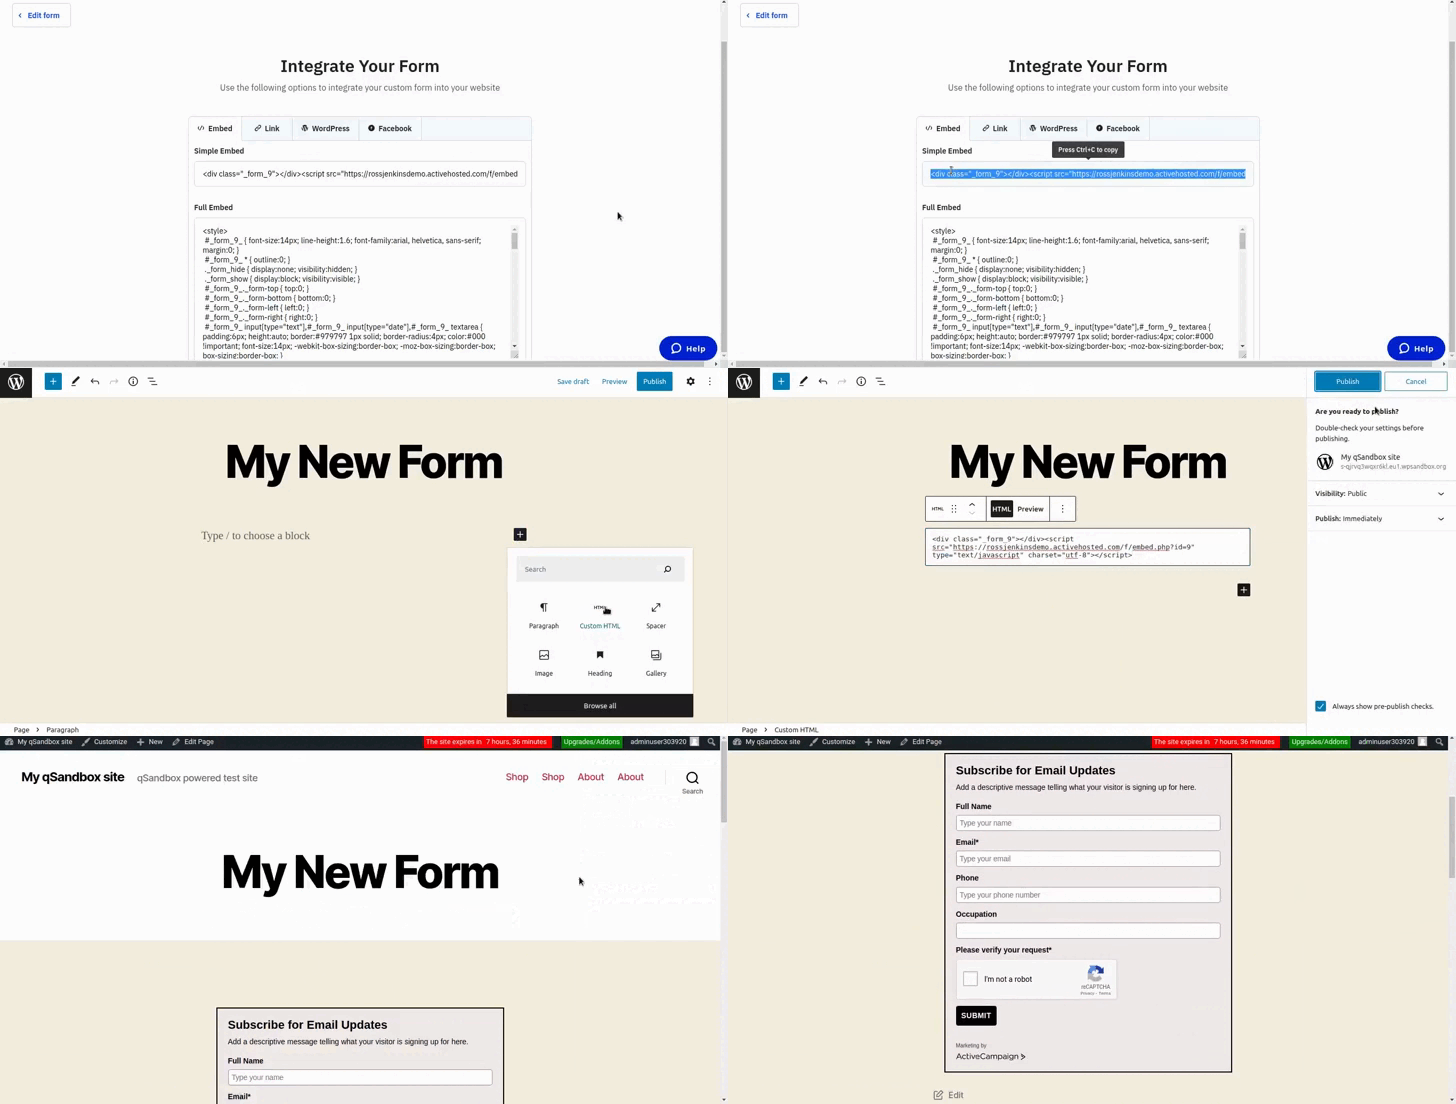
12.-After setting your automations (if you need it), you can integrate your form on your website by clicking on “Integrate”. Choose the integration that suits your website the most. If your website uses WordPress, you can download the plugin, and ActiveCampaign will automatically integrate the form.
*Note: If you are unfamiliar with embedded codes and your site is not WordPress, you can use the link option, and ActiveCampaign will host your form, or use the Facebook method, and your form will show on your business page.
13.- For this tutorial, we’ll be using the simple embedded method, so we’ll copy that code.
14.- In the WordPress page editor, we’ll add a new HTML block to place our new form.
15.- We’ll place the code and save the page.
16.- Now, the form will display on the page. Using the simple code, we ensure that whenever we make a new change on our form, it’ll show in real-time on our website.


Need some Help?
That’s how easy it is to create and use ActiveCampaign forms on your website. This way, your forms will be seamlessly integrated into your campaigns so that you can create automations that help your marketing efforts. You can also be sure that ActiveCampaign will safely store all of your data, so you won’t have to worry about security breaches. Remember that at DigitalME, we can help you build your ActiveCampaign forms and integrate them into your website. If you’re interested, click on the “Get in Touch” button and fill in the form so we can reach out to you.


 IN VALENCIA AND SAN DIEGO