What Is Spam?
Spam refers to any form of message that lands in a users’ inbox without being wanted or requested. In the context of web forms, spam refers to any unwanted submission that may include fake email addresses, commercial content, non-sense messages, and even malicious code. Typically they’re intended for commercial purposes, but spammers can use them for scams, fraud, and the spread of viruses. What makes spam so tricky is that the messages can be sent massively in bulk by bots and infected computers, which means you can be a target not once but multiple times. Nowadays, anti-spam tools and filters are doing a great job of keeping spam away, but still, malicious scripts can bypass anti-spam filters. This article will show you how you can keep spam away from your ActiveCampaign forms and the tools ActiveCampaign uses to accomplish it…

What is the purpose of spammers?
There are many things spammers try to accomplish when submitting your web forms. Most commonly, spammers try to send advertisements with links to their websites for commercial purposes and for boosting their traffic. But they may also have malicious intentions, like spreading viruses, scamming, getting personal information, and even hijacking your website. Whatever their reason is, you should try to avoid them at all costs since they can be harmful to your email deliverability and your open rates.

How can spammers affect my business?
Getting spammy submissions means that you’ll be getting unwanted data from unwanted people. It can be harmful since you may end up having a list of contacts that don’t want anything from your business but perhaps damage it. Then you’ll be sending campaigns to fake emails, which can damage your open rates. It’s also possible that you collect a trap email. Trap emails are emails used by blocklist tools to identify email senders who don’t follow good email practices, making them flag your domain as a spammer. And if that wasn’t enough, if you’re using a tool like ActiveCampaign and your contacts are limited to a certain number, you’ll be paying for keeping those spammy contacts.

What types of spammers are out there?
There are two types of spammers depending on how they submit your web forms: Manual spammers and spambots. The first ones are harder to avoid since they’re real people submitting forms to promote their website, insert backlinks, or offer their services. The spambots are programmed scripts that automatically look for web forms and make submissions. They can also try to find vulnerabilities on your website to inject malicious code. A spambot is easier to detect as it follows patterns only bots can perform.
Is ActiveCampaign good for keeping spam away?
Yes. ActiveCampaign has some functions that help you avoid spammers. For example, they include Google reCAPTCHA, which adds a layer of security to your web form by asking submitters to complete a challenge only real humans can achieve. They also have the double opt-in functionality that makes users confirm their subscription by opening a link sent to their email addresses.

Four Methods to avoid spam on your ActiveCampaign forms
This tutorial will show you four different methods you can follow to avoid getting spammy submissions on your web forms. Note that these methods can complement each other to prevent spam, or you can use whichever you consider the best option for your website:
Method 1: Add Google’s reCAPTCHA field
Google reCaptcha is Google’s CAPTCHA (Completely Automated Publish Turing test to tell Computers and Humans Apart) system that sets humans and robots apart. It requires users to complete a challenge to verify their “humanness”. To enable it on your web forms:
1.- In the web form builder, look for the “CAPTCHA” field, drag it, and drop it in your form.
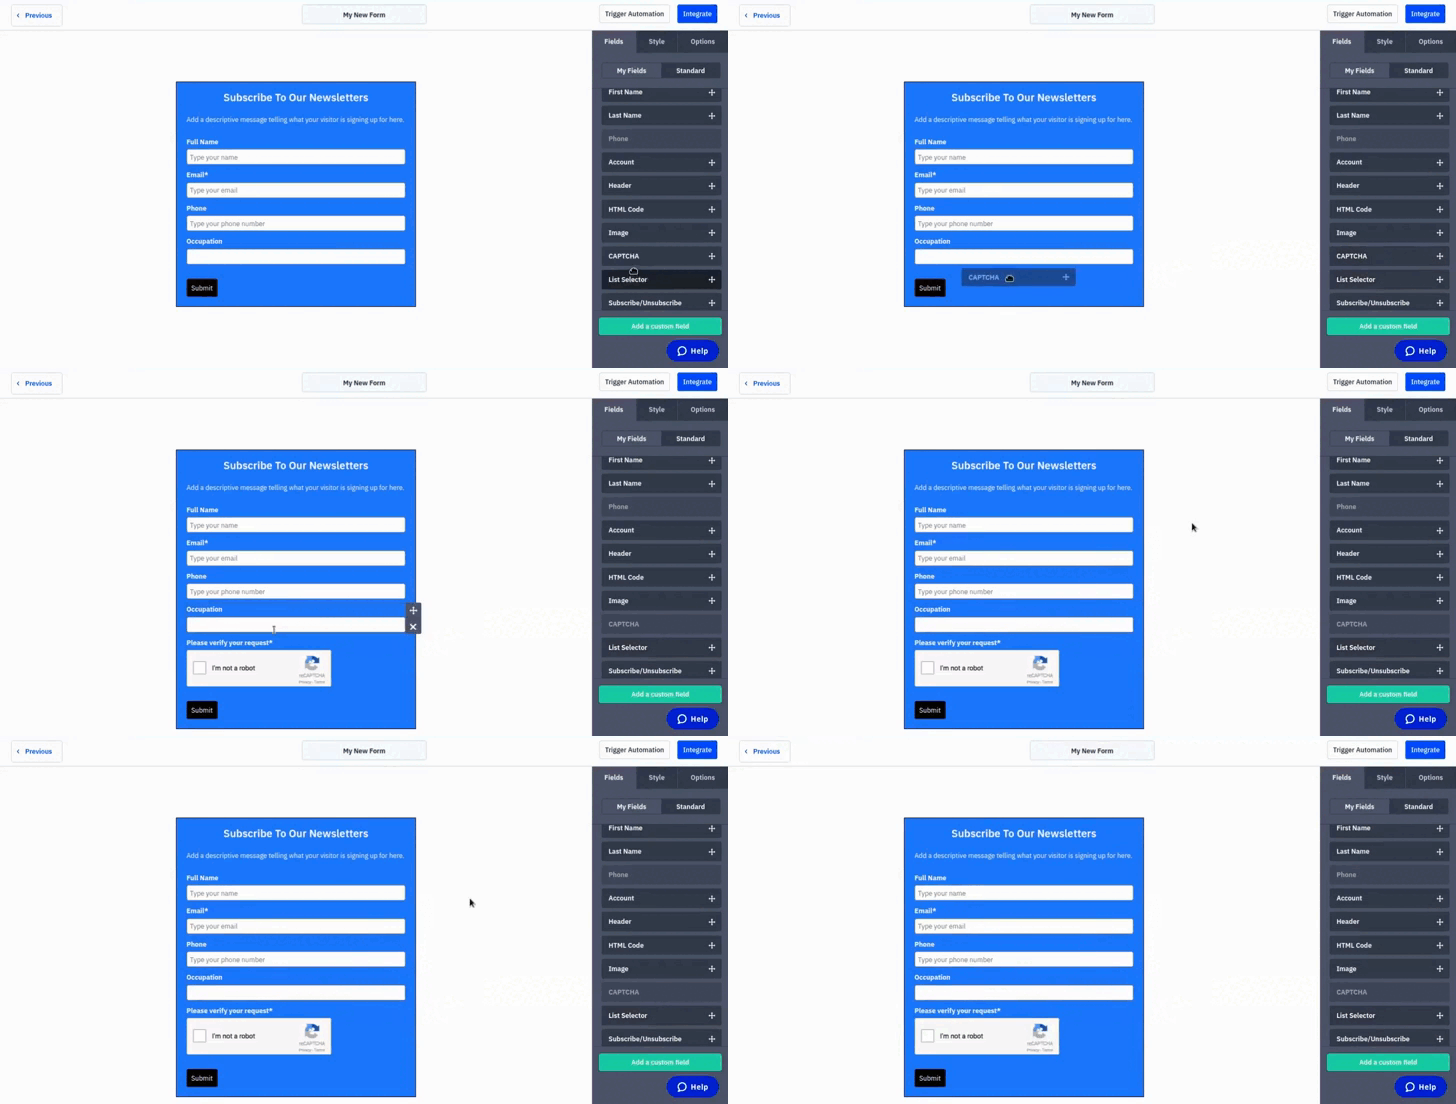
2.- After you save and publish the web form, the users will need to complete a challenge before submitting.
Method 2. Use a Honeypot Field
A honeypot field is a trap field that only bots would be able to detect and fill in before submitting. Using the non-empty field, you will know which submission was sent by a bot and which one was sent by an actual human. Then you’ll need to tag those submissions and unsubscribe them from your list through an automation. Follow the next steps to use this method:
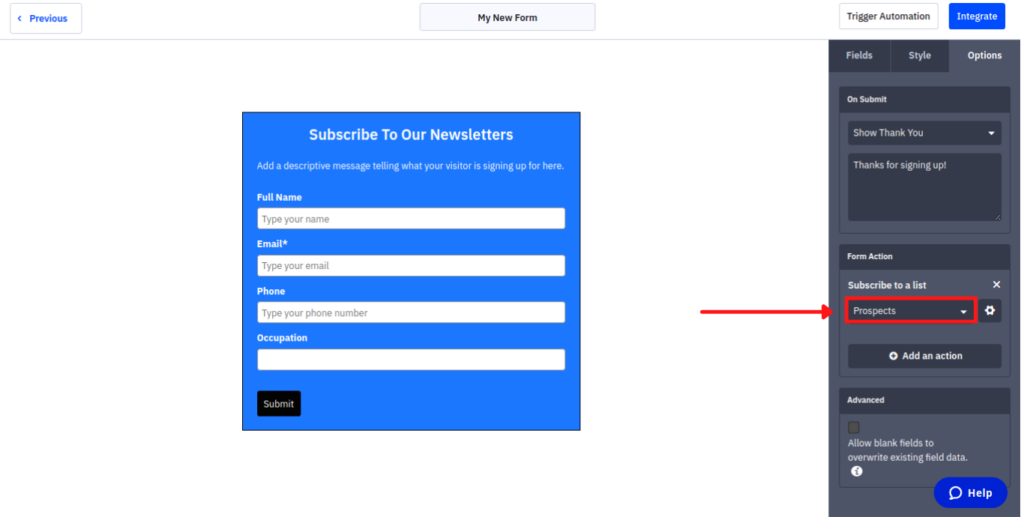
1.- While building your form, add a custom hidden field.
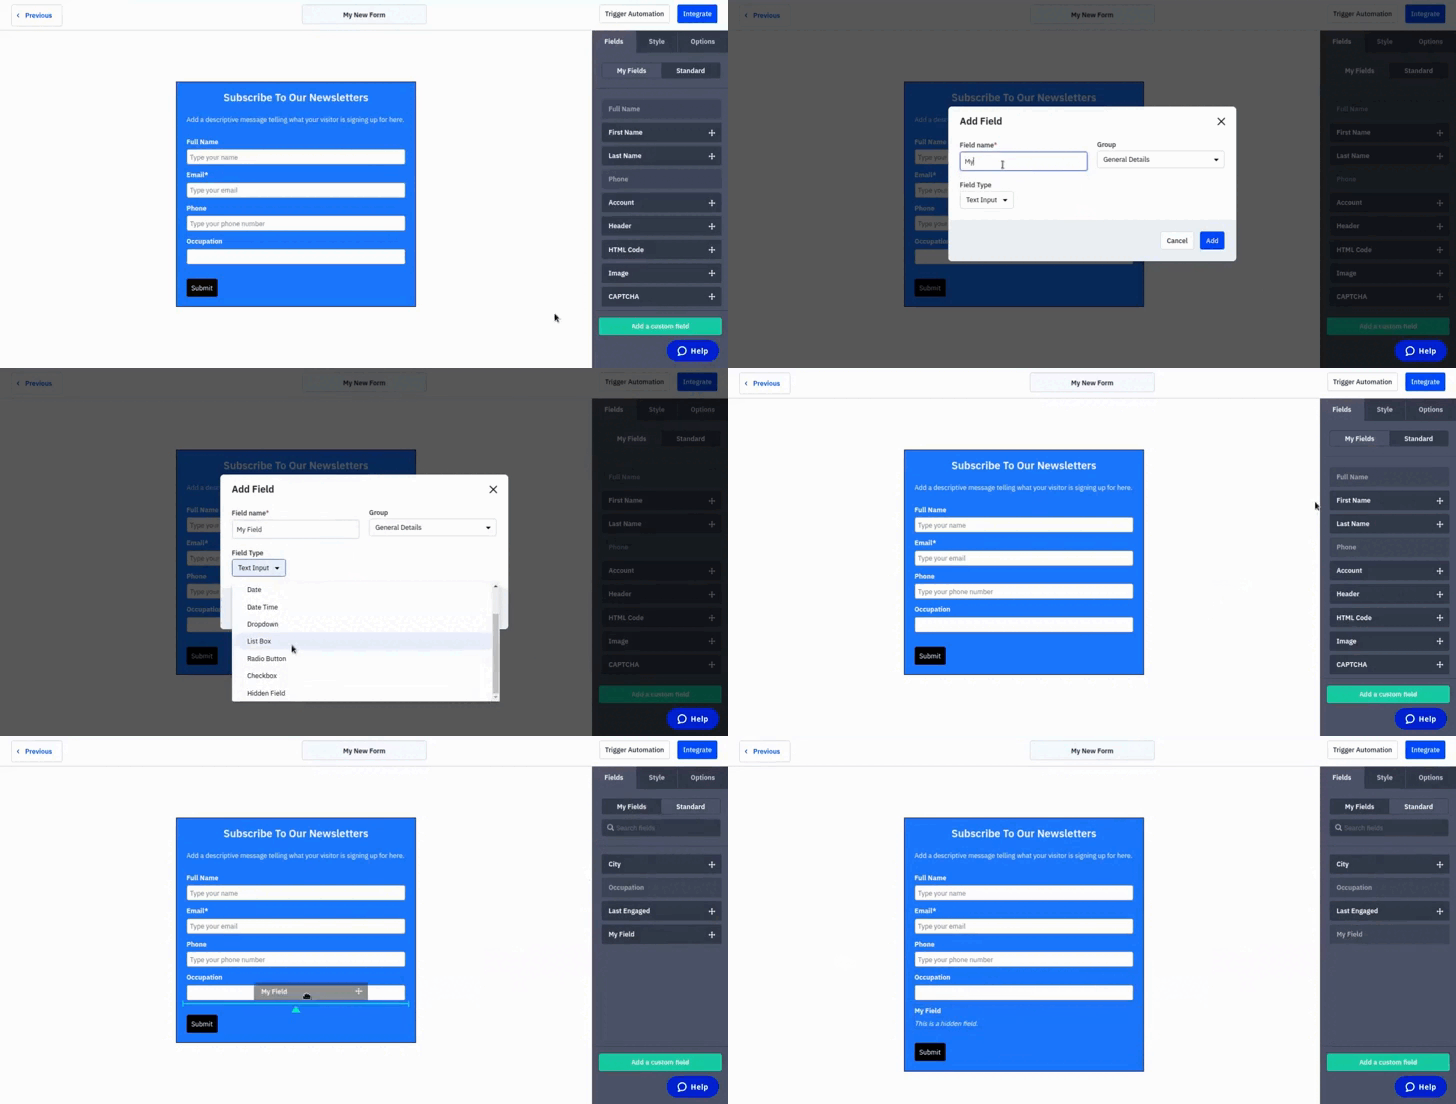
2.- Make sure you know the list your users will be subscribing to after completing the form. They’ll be subscribing to the list of “Prospects” in this case.
3.- Save your form.
4.- On your ActiveCampaign dashboard, go to “Automations” and click on “Create an automation” to create a new automation.
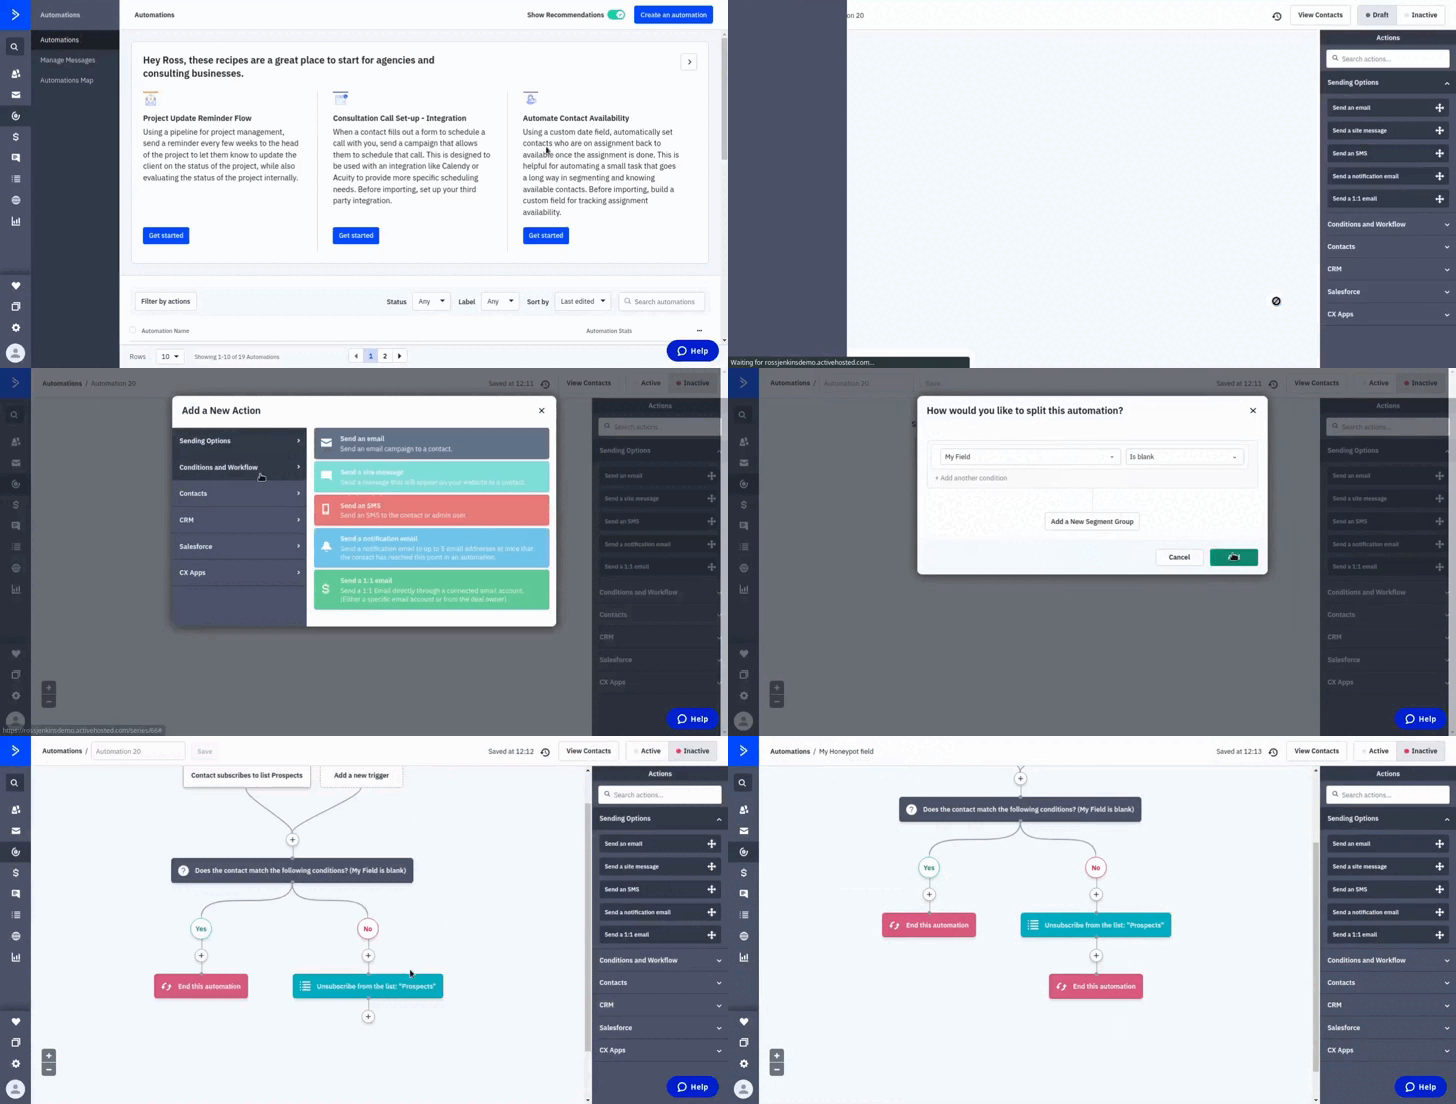
5.- Choose “Start from scratch” to use a blank canvas.
6.- For the start trigger, choose “Subscribe to a list” so the automation will apply only to contacts that subscribe to your form list. In this case, we’re going to select the Prospects list and run the automation multiple times so we can unsubscribe if the spammer submits again.
7.- For the action, choose an if/else workflow as the next action, and select “Custom Contact fields” as the conditional. Look for the hidden field you’ve just created and look for the “is blank” property. Click “Add” to add the conditional.
8.- Then, you’ll have to set the action that comes if the subscribers have the hidden field empty. In this case, we don’t want to do anything with those contacts, so add an “end this automation” action.
9.- For the users that don’t have the hidden field empty, we want to unsubscribe them as we already know those were bots subscriptions. So we’re going to choose “unsubscribe” as the action that comes after the “No”.
10.- Finally, we end the automation for those contacts, too, as we already unsubscribed them.
11.- Since we set the trigger to run multiple times, ActiveCampaign will immediately unsubscribe it again if the spammer attempts to re-subscribe.
Method 3. Enable double opt-in
ActiveCamapaign has double opt-in enabled for their subscription forms by default. You can check if your subscription form is using a double opt-in subscription by following these steps:
1.- Go to your main dashboard and click on “Site” to see all of your website integrations.
2.- Select “Forms” to see your list of forms. Look for the form you want to confirm and click “Edit”.
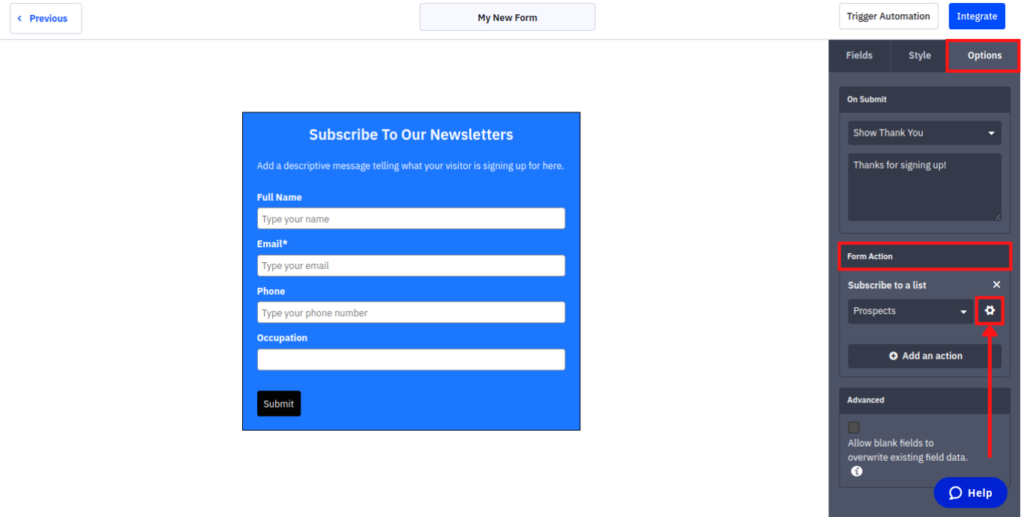
3.- Then click on “Options” to see the current settings of your form.
4.- Look for the “Form Action” window. You’ll see the action you chose to trigger after users submit the form. On the side, you’ll see a gear icon; click on it to see the opt-in options.
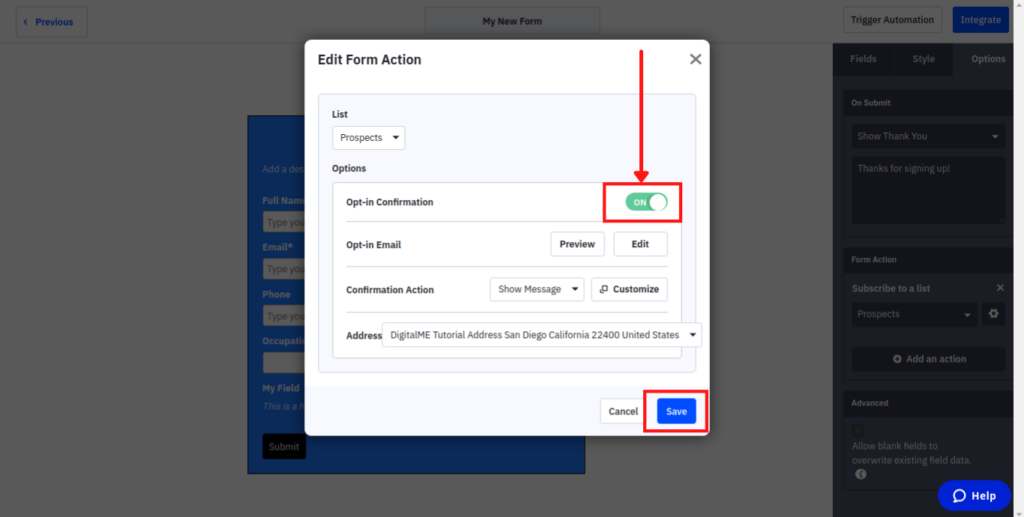
Enable opt-in confirmation
5.- There, you’ll be able to enable and disable opt-in confirmation, edit the confirmation email, and the action that will take place after they confirm.
6.- After you enable the opt-in confirmation, users that attempt to subscribe to your lists will need to confirm their email addresses. It will ensure the email addresses they’re submitting are real.
Note: Double opt-in works well for most cases, but there could be some unique situations where you can consider not using it. If this is your case, we recommend you read the GDPR documentation and ensure your data collection is compliant with the applicable data regulations.
Method 4. Validate and clean your email lists
It could be that, for some reason, a spammer escaped your filters, and you end up having them on your contact lists. It’s also possible that some of your contacts aren’t using their email addresses anymore. It can damage your email deliverability when this happens since your emails aren’t being opened anymore. Using an email validator will check your subscription lists once they have contacts already on them. Some tools help you validate your contact lists by checking the email addresses, comparing them with some blocklist databases, and checking if they’re still active. Then you can use the results to clean your lists.
Back up your list
One of the best validator tools is ZeroBounce. It’s an affordable tool that checks and validates your contact lists to see if the email addresses are legit. To use ZeroBounce and clean your lists, follow the next steps:
Note: This tutorial will remove some contacts from your lists. It’s highly recommended to read each step carefully and back up the list(s) you’re about to validate and clean.
1.- On ActiveCampaign, click on “Lists” and open the list you wish to clean. Then click on “Export”. Choose all fields since it will be your backup if you delete the wrong contacts.

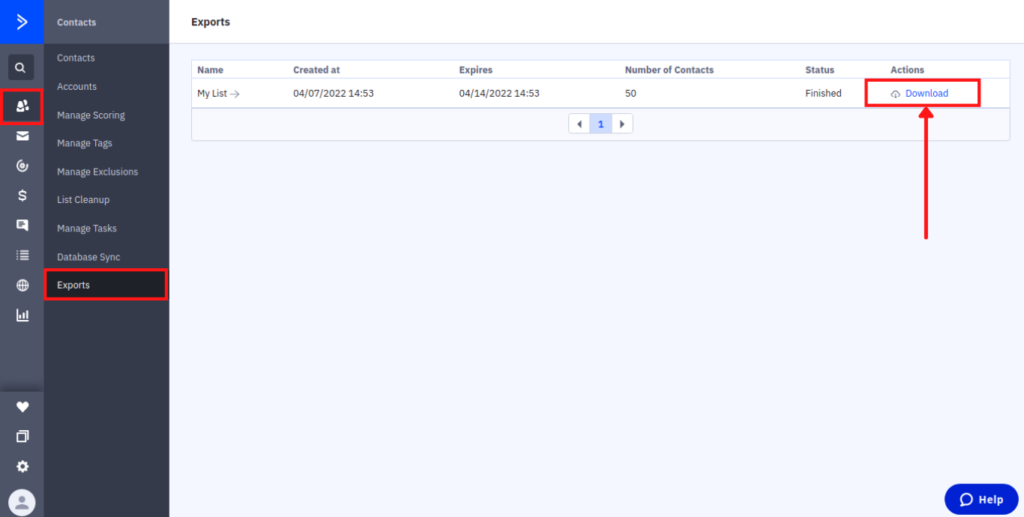
2.- The export progress will start running. It may take some time, depending on the length of your list. Once it’s finished, you’ll be able to download it.
3.- To check if the export is ready, go to “Contacts” in your menu, and click on “Exports”. There you’ll see the status of the latest export. If it’s ready, you’ll be able to download it.
4.- Once your export is ready and you have downloaded it, you’ll be able to upload and validate it on ZeroBounce.
Validate on ZeroBounce
5.- Create an account at ZeroBounce. It’s free for lists that contain 100 or fewer email addresses. Depending on its length, if you have a more extensive list, it will charge you a fee per email.
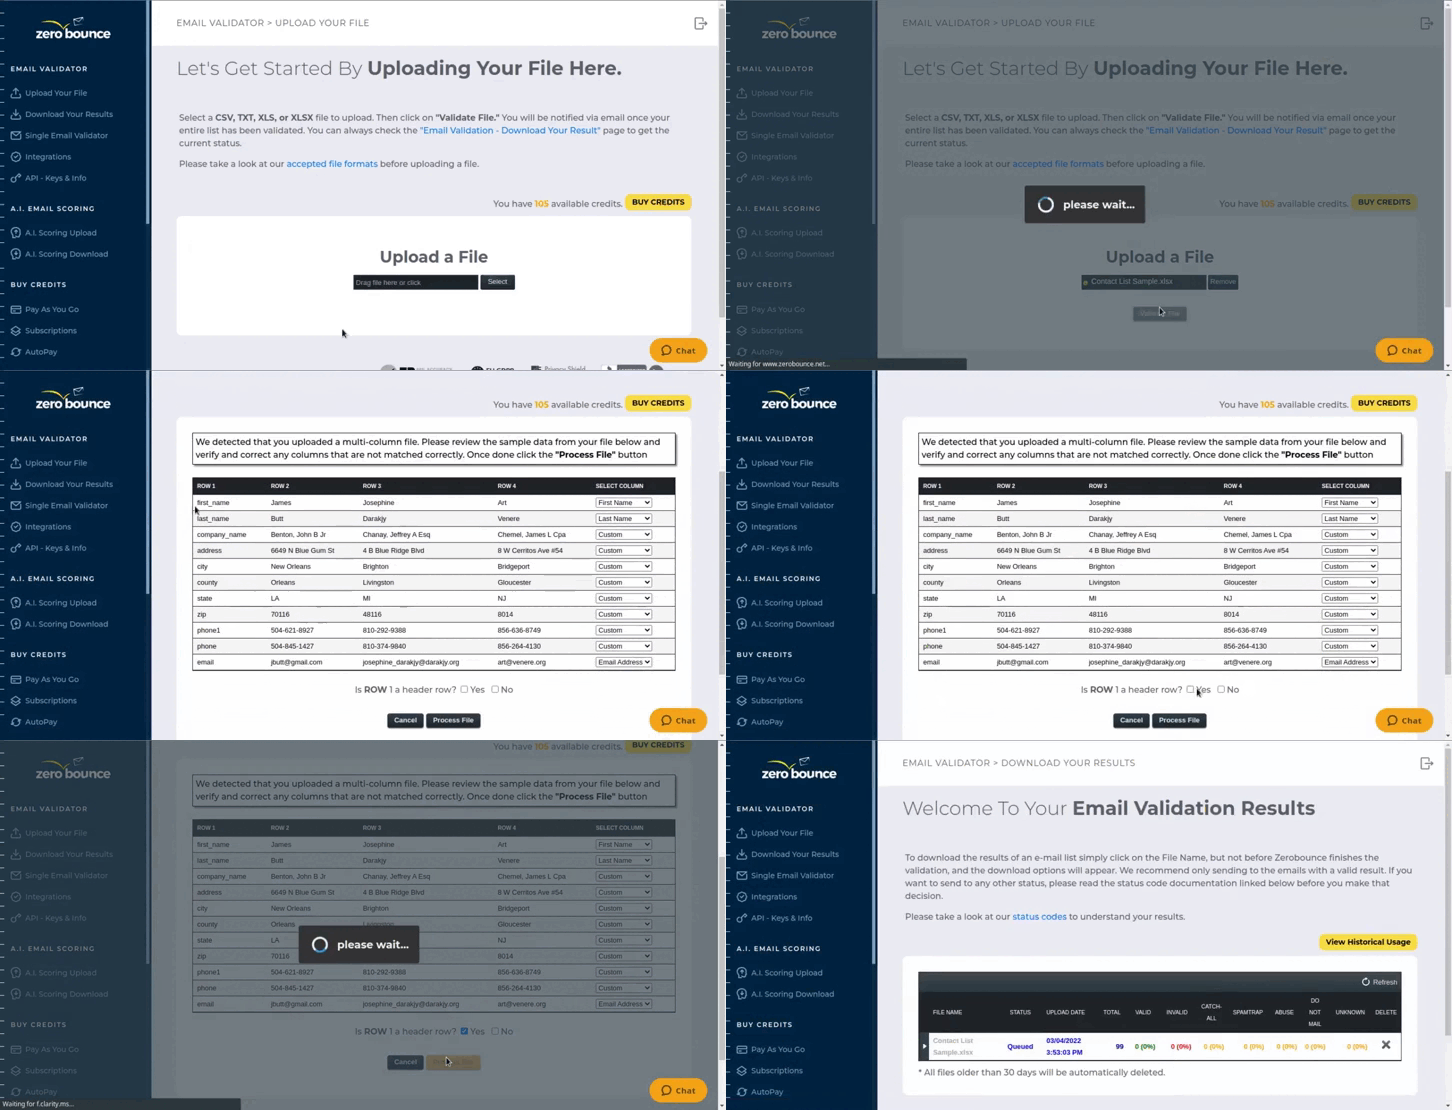
6.- Go to your ZeroBounce account and click on “Upload File” to upload your exported list.
7.- Select your file or drag and drop it.
8.- Map the fields according to your list. If the list has custom fields, add them by choosing “Custom”. Make sure you match the email field since that’s what ZeroBounce will use to validate your contacts.
9.- Click “Validate” to start validating your list.
10.- ZeroBounce will start validating your email addresses. It might take some minutes, depending on the length of the list. After the list has been validated, you’ll be able to download the file.
11.- You will be able to download the results zip file. It will contain various files, including lists of invalid and spam emails. You can see the difference between each file here. We recommend you to open each file with those emails separately.
Clean your list
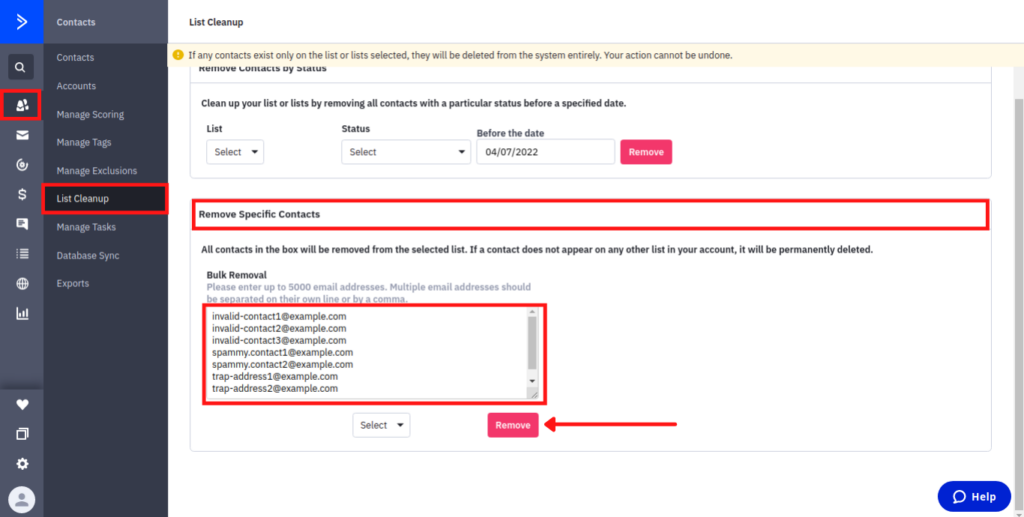
12.- On your ActiveCampaign account, click on “Contacts”, then click on “List Cleanup”.
13.-This step will remove the email addresses from the ZeroBounce invalid and spammy addresses. We highly recommend you only copy and paste email addresses from the following files:
_abuse.csv
_catch_all.csv
_donotmail.csv
_invalid.csv
Also, make sure you have fully backed up the list you’re about to clean (hence the importance of exporting the list with all fields in step 1)
14.- Copy and paste the email addresses in the “Remove Specific Contacts” window.
15.- Select the list from which you want to remove those contacts. For this tutorial only, we will select the “Prospects” list.
16.- Click “Remove” to remove those contacts.
17.- It’ll remove all the contacts you pasted. If you pasted all the contacts from the files we named, you should have a clean list of contacts.

Need some Help?
That’s how you can keep spammers away from your ActiveCampaign forms. It’s straightforward, although cleaning your lists can get tricky, especially if you don’t have experience in list cleaning. Avoiding spam will undoubtedly increase your email deliverability and keep your open rates more accurate. Remember that at DigitalME, we can help you keep spam away from your website and secure your web forms through ActiveCampaign. If you need help or advice on that matter, feel free to contact us by clicking the “Get In Touch” button and completing the contact form.

 IN VALENCIA AND SAN DIEGO