What is Maropost?
Maropost is an eCommerce and multi-channel marketing platform. It was founded by Ross Andrew Paquette in 2011 and is one of the fastest-growing companies in the United States. Maropost began as an email services provider always putting the customer at the center of its services. That’s what allowed Maropost to build a reputation of having outstanding customer service. Since then, Maropost has added multiple services to its platform related to marketing, eComerce, and automation. What is so special about Maropost is the capabilities it gives to users to operate all of the parts of marketing workflows within a single platform.

What is Maropost Marketing Cloud?
Maropost Marketing Cloud is its flagship service that allows any business to operate its marketing workflows. It allows handling email, SMS, social media, and web marketing on a single dashboard. You can build your campaigns for each one of those channels with its powerful builders. It also uses trigger-actions automations to perform the tasks necessary to operate a sales flow. So you can literally configure your marketing workflow and Maropost will take care of it.

What is Maropost eCommerce cloud?
Maropost eCommerce cloud is Maropost’s innovation for eCommerce business. It allows businesses to build their eCommerce stores and manage their inventory, sales, and fulfillments on a single platform. What makes Maropost eCommerce so peculiar is that it allows operating sales and inventory across multiple channels. You can have your own website and/or sell your products through Amazon and eBay. It also has great integration with third-party popular apps such as Xero and Zendesk.

Hou much does Maropost cost?
Maropost’s cost varies depending on the service and plans you acquire. For the eCommerce cloud, it doesn’t give information for a fixed price, you have to contact them in order to get your custom price. For the eCommerce cloud, its cheapest plan costs $79 per month and its custom one is above $269. You can book a demo to try the Marketing cloud, or start a 14-day trial for the eCommerce one.

If I just acquired Marketing Cloud, how do I set it up?
If you want to start configuring your Maropost account. you need to understand some concepts first necessary to understand how your marketing cloud operates:

DNS
Domain Name System is a system convention that allows interpreting human language names for websites to help connect them to the server ID of the website. Let’s say you want to connect to “Digitalme.cc”, a DNS is responsible to identify which IP belongs to that site so you can connect to the server.

DNS Records
The DNS records are instructions located on a nameserver that give the guidelines on how requests are handled for a specific domain. They contain information like the IP address for the site and pointers to subdomains. In order to verify your domain on Maropost, you will need to update these records. Make sure to check which is your DNS nameserver to be able to update your DNS records.
SSL
SSL stands for Secure Sockets Layer and is the security protocol that allows connecting two systems safely by encrypting the shared data. Connecting to a website with an SSL certificate means that all the data a user shares with it remains safe.

"A" record
The A record is responsible for mapping the IP address of the server that hosts the domain of a website. You can configure these records on the DNS server for your domain and you can configure more than one A record if your domain needs it.

CNAME record
A CNAME record is used to create an alias for your domain so it delivers the same content using a different domain name. For example, CNAMEs can be used when you need to set up a subdomain to deliver the same content that the root domain.
You don’t need to deeply understand these terms, as long as you have the general idea for each, you can start configuring your Maropost Marketing account to start sending emails and track your campaigns. Follow the next steps to set up your Maropost account.

Set up your sending domains
Step 1: Configure Sending Domain
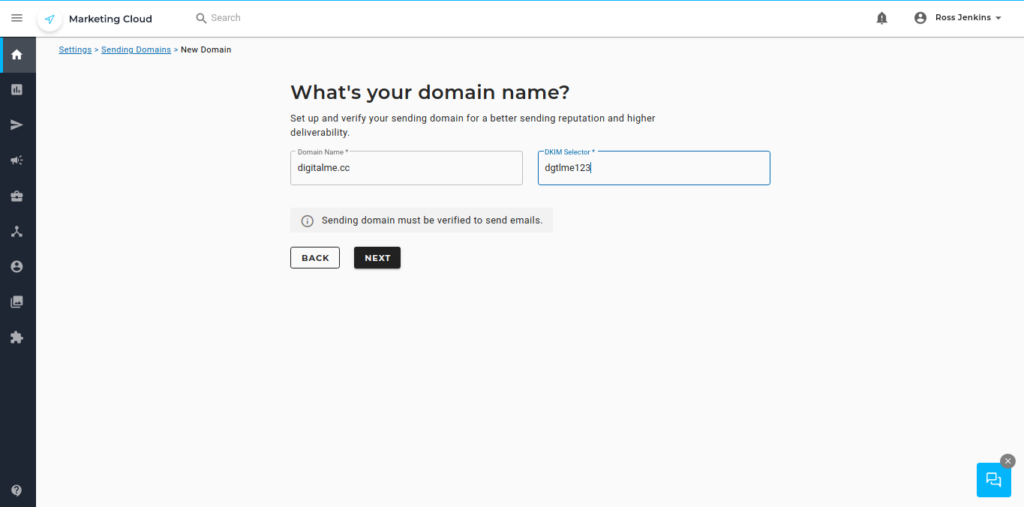
The sending domain is the domain you want to validate to send your emails from. Depending on your marketing plan, you can add multiple sending domains. To configure your sending domains follow these instructions:
1.- In the main dashboard look for the “Email Settings” in the drop-menu that opens when you click on your name.
2.- There you’ll see the DNS Setup option for your Maropost account. Click on the “Sending Domains” option.
3.- Type in the domain you are planning to use for sending emails.
4.- Type in a domain DKIM selector for your sending email. This will serve as an identifier when validating signatures. It can be an alphanumeric keyword such as dgtlme123.
5.- Click on “NEXT” to go to the next step.
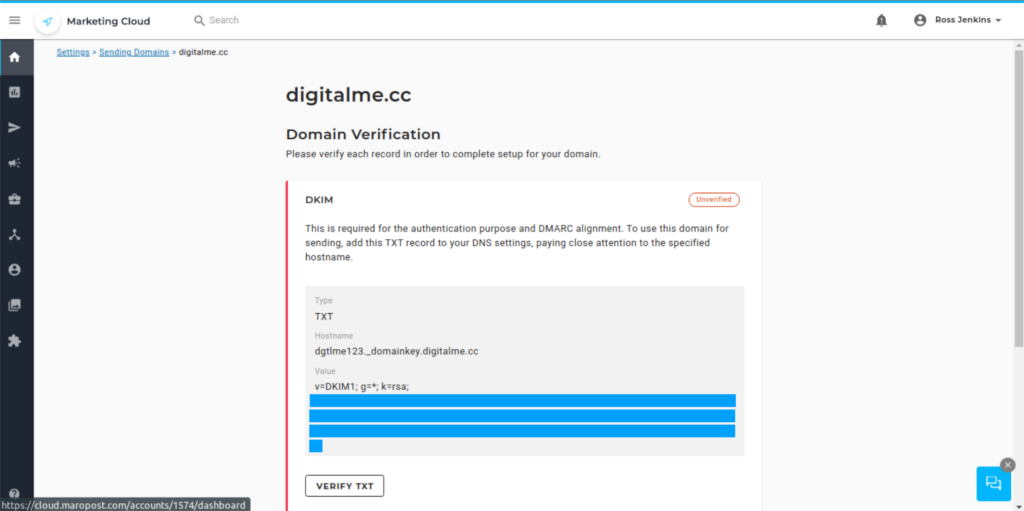
6.- You’ll see the verification page. It’s important to verify your domain to be able to send emails from Maropost. This will allow it to send emails on your behalf and your mails will be marked as secure.
7.- Start with the DKIM first. Go to your nameserver provider and add a TXT record with the hostname and value provided. When you’re done go back to the verification page and click on “VERIFY TEXT”.
8.- Now let’s verify the SPF record. The same as before, create a TXT record on your nameserver provider and copy and paste the respective inputs into their respective fields. Next click on “VERIFY TEXT”.
9.-Next you have to verify the Yahoo! Feedback Loop. This will allow your domain to get reports about who makes spam complaints about your emails. By doing this you can omit them from your sending lists.
10.- Create a mailbox account for postmaster@yoursendingdomain.com. Replace yoursendingdomain.com with the domain you’ll be sending emails from.
11.- Register on the Yahoo! Feedback Loop utility. Use the information from the Maropost validation page. Once you finish click on “Get Verification Code” to receive a verification code and finish with the configuration.
12.- Click on “DONE” once you have finished configuring the YFL utility.
13.- Once you have configured and verified the previous records, you’ll be able to send emails from Maropost. You can also configure the recommended options by following the steps given on the validation page, so your emails will be securer and you will get more insights on them.
14.- Click “Done” when you’ve finished validating your sending email.
Step 2: Set Up Tracking Domains
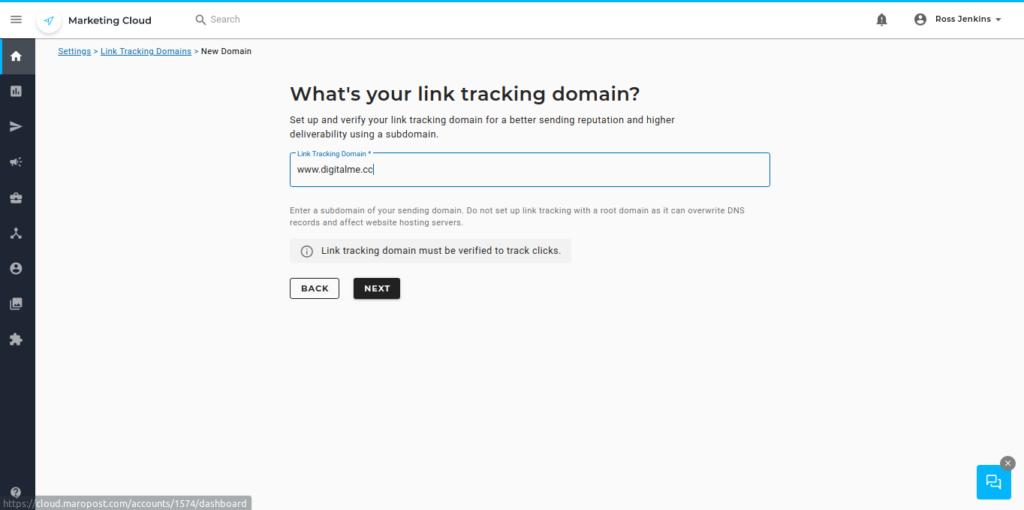
Tracking domains are the domains that will be used for tracking links in your emails. You can set multiple tracking domains for your Maropost Marketing Cloud account. These domains also need to be verified in order to be able to use tracking. To set up tracking domains, follow the next steps:
1.- On the main dashboard click on your username and look for “Email Settings”. Click on that option to display your email configuration.
2.- Click on the “Link Tracking domains option”.
3.- Click on “New Domain” to add a new link tracking domain.
4.- Type in the domain that you want to use to track your emails. Domain has to include the www prefix. Click “Next” to go to the next step.
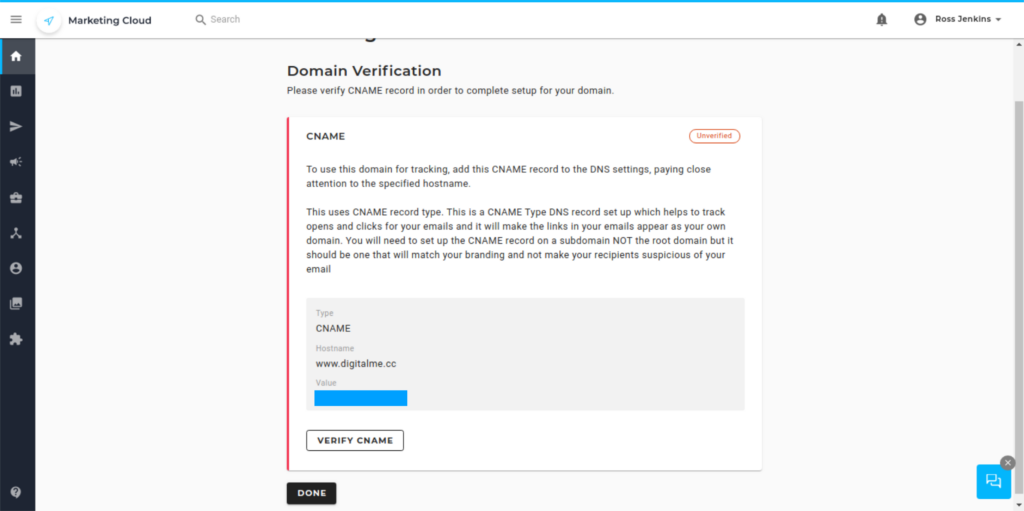
5.- You’ll see a CNAME record that you need to use in order to verify the tracking domain. Be sure to create a CNAME record with your nameserver provider and copy and paste the values from the Maropost validation page.
6.- After you have created the CNAME record on your nameserver click on “VERIFY CNAME” to verify your domain.
7.- Your tracking domain will be verified and an SSL certificate will be automatically created for it by Maropost. If there is an issue with the SSL certificate is probably due to your domain having a CAA record restricting Maropost to issue the certificate for your domain. You would need to add an exception so Maropost is not restricted to do it.
Step 3: Set up dedicated IP ADDRESS (for dedicated IP address plans only)
If you have a Maropost Marketing Cloud plan that allows you to use a dedicated IP address instead of a shared one, you have to add one or more “A” records in order to be able to use those dedicated IP addresses. To do it follow these steps:
1.- Look for your list of assigned dedicated IPs addresses.
2.- Create a new “A” record for each IP address and associate the record with a subdomain of your website. Never link the IP address with your root domain.
3.- Create an “A” record for each different IP address with a different subdomain. You can’t link the same subdomain for a different IP address.
4.- Be sure to notify the Customer Success Manager about the records you have set. They need this information to update Maropost’s records and you will be able to send emails from Maropost’s dedicated IP addresses.

Let us help you with your marketing strategies
That’s it. That’s how you set up your Maropost account and you can start sending email campaigns to your list of contacts. If you find it difficult to set up and verify your sending and tracking emails we can do it for you. We offer fully managed services for Maropost, and we also provide advice and optimization of your marketing strategies overall. If you are interested don’t hesitate to contact us and we’ll reach to you as soon as possible.


 IN VALENCIA AND SAN DIEGO